When it comes to eye makeup, the main desire is to attract attention to the eye, making your art (and natural beauty) stand out!
Understanding Your Canvas: Eye Shape and Color
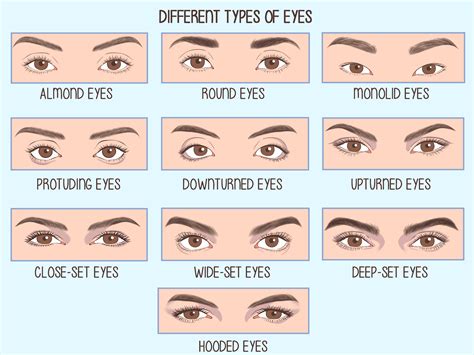
The main element you will have to take into account first will be the eye shape. It took me a while to understand why a certain makeup look doesn't look as good on me as on someone else. The reason? I have deep-set eyes, and for example, I was attempting to create a makeup look that was modeled on a girl with almond-shaped eyes. This attempt resulted in my prominent brow bone creating shadows in the areas where I didn't want these shadows to be, which made my version very different from what I was trying to replicate.
First, you will need to determine the eye shape you are working with before beginning the makeup application. There are several eye shapes: round, almond, monolid, hooded, small, protruding, downturn, upturn, and deep-set eyes.
The eye color you are working with on your client (or on yourself) is also an important factor in choosing the right eyeshadow color. Depending on the eye color, some colors can make you look tired, while others will make your eyes look bright and sultry. You always have to use products that compliment your eye color.
- For blue eyes, choose oranges, reds, and warm browns.
- For green eyes, purples, burgundy, and warm browns or red colors are the ones that will make your eyes pop.
Essential Tools: Must-Have Brushes
If you want the eye makeup to be perfect and professional - you will need to ‘invest’ in some great brushes. There are a ton of brushes on the market right now (and luckily, they really don't have to be very expensive!); Morphe Brushes, E.L.F, or Real Techniques have really good quality affordable brushes!
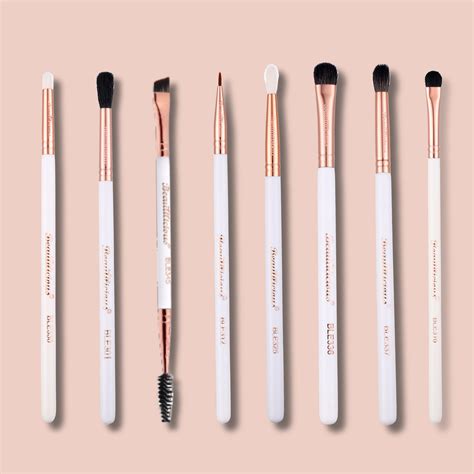
A Core Set of Brushes for Eye Makeup
For an elevated or everyday shadow look, we recommend a core set of four brushes:
- A fluffy brush to dust all over the lid.
- A domed brush for the crease.
- A flat and dense brush for the lashline.
- A small brush for highlight.
You don't have to drop a bundle for the best brushes on the market: Our pros at the Good Housekeeping Institute Beauty Lab found that affordable synthetic brushes are almost always preferable to their pricier natural-fiber counterparts. All of the top performers in our Lab tests are synthetic; the pros couldn’t differentiate them from pricier natural picks!
Recommended Brush Sets and Individual Brushes
Here are some highly-rated options:
BEST FOR BEGINNERS: Urban Decay Naked2 Basics Eyeshadow Palette
BEST DRUGSTORE PALETTE: Revlon ColorStay Eyeshadow Quad
BEST VALUE PALETTE: Maybelline New York Mini Eyeshadow Palette
MOST VERSATILE PALETTE: Morphe 35U Gilded Desert Artistry Palette
BEST ALL-IN-ONE BRUSH SET: Morphe Eye Got This 4-Piece Brush Collection
BEST ALL-OVER SHADOW BRUSH: Make Up For Ever Medium Eye Shader Brush
BEST BRUSH FOR CREASE: e.l.f. Fluffy Eye Blender Brush
BEST ANGLED SHADOW BRUSH: MAC 263 Synthetic Small Angle Brush
Perfect Makeup Application: A Step-by-Step Guide
Mastering the art of eye makeup application can be a challenge, especially for beginners. From choosing the right shades for your eye color and skin tone to figuring out which brushes you actually need (and which are worth it), there's a lot to consider. That's why we've created a comprehensive five-step guide to help you navigate the world of shadow application and demystify how to use that eyeshadow palette.
Step 1: Prepare Your Eyelids
Before you begin your makeup routine, make sure your skin is a “clean slate.” Wash your face with your favorite facial cleanser, to remove bacteria, dirt, oil, and old makeup residue that could interfere with your makeup application. Then, apply serum and moisturizer to help hydrate your skin (don’t forget SPF for daytime). Proper skin prep can help ensure your skin is smooth and hydrated ahead of your makeup application.
As mentioned, applying primer should always be the first step in your makeup routine. This makeup step is key because it creates a smooth, even base for your products to adhere to and can help ensure your look lasts. It will even out the skin color of your eyelids if you have veins or discoloration, it will make the payoff of the eyeshadow color and pigment much better and it will make your eyeshadows stay the whole day without fading. I think this tip is the most important! It will prevent your eye makeup from cracking and it will make your blending more diffused.
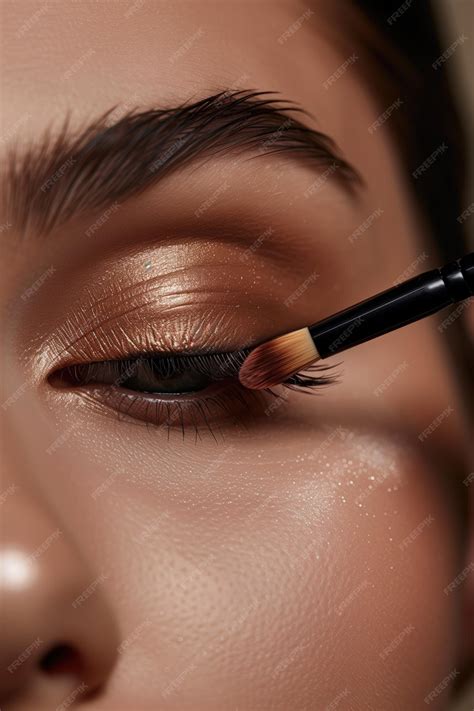
Innovative Primer Options
Meet the innovative, multitasking primer your makeup routine has been missing. This water-based primer with snow mushroom and niacinamide helps hydrate, calm, and revitalize skin. It also helps smooth the skin texture and makes pores appear smaller. If you love the look of radiant-looking skin, this lightweight primer may be a great addition to your makeup routine. The illuminating formula provides up to 24 hours of hydration and leaves the skin looking bright and glowy.
Step 2: Apply a Base Eyeshadow
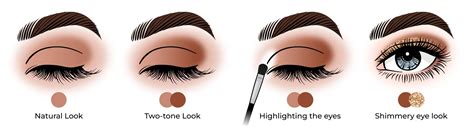
Use your second-lightest or a medium-toned shade to sweep a wash of color over your entire lid to add dimension or to lay the canvas for a more dramatic look.
How to: Using your eyeshadow brush, sweep your base shade onto your eyelid using back-and-forth motions from inner to outer corner. Depending on the look you’re going for, you can bring this base color all the way up to your brow bone in preparation for a more dramatic smoky eye, or you can stop at the crease of your eye for a basic, everyday look.
Step 3: Concentrate Darker Shadow in the Crease
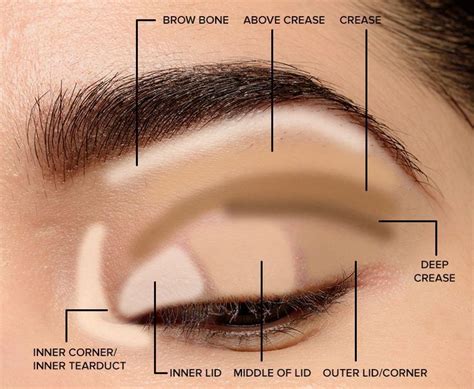
Placing a darker tone of shadow in the crease of the eye makes your eyes pop by adding depth and dimension in the exact right spot. Prep your crease with the light brown eyeshadow first and then take medium brown and then dark brown or even black eyeshadow. Prepping your crease with a lighter shade will make it easier for you to blend the darker shade later.
How to: Dip a domed brush into the second-darkest shadow you have and sweep it right along the eye socket, following the shape of your eye between your brow bone and eyelid. A deep brown is a universally flattering choice, no matter your eye color.
If you have hooded eyes, you will have to play with different, higher placements for crease shadow (if you simply apply it along the eye socket, the color will disappear when you open your eyes). Instead, place the color just above the natural crease when your eyes are open, and work down toward the lash line, smoothing out any hard lines and focusing pigment on the outermost corner of the eye in a "V" shape.
Step 4: Rim Your Lash Lines
To make your lashes look thicker and make eyes pop, rim a super-dark eyeshadow around the eye, top and bottom. The darker eyeshadow, the smaller the brush should be. This will make your application more precise to the areas which need to be darker to emphasize your eyes (outer corner, for example).
How to: Use a flat, short-bristled brush to press the darkest color you have along the edges of your upper eyelid where your eyelashes begin, and along the lower lash line. Don’t apply too high on your upper eyelid or too low on your lower eyelid with dark eyeshadows.
If you like to wear eyeliner, you can trace this line or even rim your waterline with one of our favorite waterproof eyeliners.
Eyeliner Recommendations
- BEST LIQUID EYELINER: Stila Stay All Day Waterproof Liquid Eyeliner
- BEST PENCIL EYELINER: COVERGIRL Exhibitionist 24-Hour Kohl Eyeliner
Don’t be afraid of tight lining, it will create a huge difference and will make your lashes look thicker and deeper. It is especially helpful for those with hooded eyes as the skin over the eye will hide the eyeliner.
Step 5: Highlight Strategically
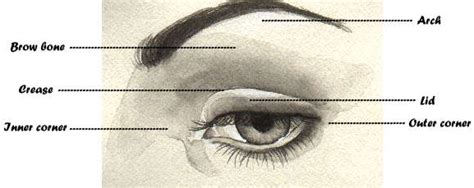
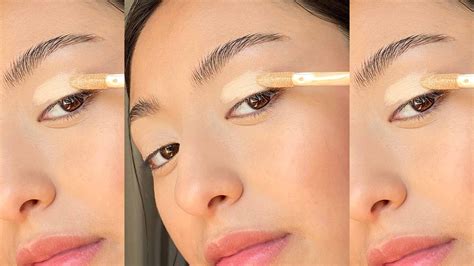
Make your brows pop, add lift and finish the look by strategically adding a shimmery pale eyeshadow, or the lightest color shadow you have. Pay attention to the inner corner of your eye, which always should be a slightly lighter highlight to “open up” your eyes.
How to: Using your finger or a precise brush, tap the lightest color in your arsenal directly under the arch of your brow. Add the same pearly light color to the inner corner of the eye to brighten things up, too. The brow bone has to also be gently highlighted to “lift” the brow and to create an illusion of a bigger eye. This is a classic technique that works for all eye shapes. Always!
Finishing Touches for Your Eyes
If you want your lighter eyeshadow to pop even more, you can use a darker base for them, it can be a brown or black eye pencil, cream eyeshadow, or even a gel liner. Keep in mind if you use a powder black base, the color will not show up.
Finish with a few coats of mascara. The best formula largely depends on your desired end result. If you’re after full, thick fringe, you’ll typically fare best with a volumizing mascara.
Mascara Recommendations
- This drugstore staple features an exclusive double-hook bristle brush that captures every lash for a one-and-done application.
- If you love the look of falsies but can’t stand the application process, this mascara is for you. The volumizing formula makes lashes appear up to 12 times fuller for a false lash effect without the glue (or mess).
How To Apply Mascara Like A Pro | Tips and Tricks | MakeupAndArtFreak
Expert Tips and Tricks for Flawless Application
Precision in makeup comes from calm energy and steady focus. Mistake #1: Putting too much product on your brush. This is the number one cause of eye shadow fallout. Tap off the excess every time you grab the eyeshadow from a pan. Don’t take too much product on your brush.
If somehow you applied more eyeshadow than you needed and want to dilute it, take a matte light (ecru or nude) eye shadow on a fluffy brush and go along the area you want to make lighter. It will really help you to blend everything.
Mistake #2: Not using a primer before applying powder eye shadow. Primer serves many purposes, including moisturizing dry lids, helping shadow stay on longer, and preventing loose shadow from falling on your cheeks.
Mistake #5: Skipping shadow underneath your eyes. Putting shadow on the small lid underneath your eyes can complete your look.
Mistake #6: Limiting your eye makeup to traditional eye shadow products only. We suggest experimenting with other types of makeup to add depth and dimension to your lids. For example, try using wet blush to create a sunset-inspired look, or use your bronzer to add a sun-kissed effect.
Mistake #8: Using only a makeup brush to apply eye shadow. Your fingers are your greatest secret weapon and can do a lot of things that even fancy brushes can't.
Common Eye Makeup Mistakes to Avoid
Here are some common pitfalls to steer clear of:
- Mistake #1: Putting too much product on your brush. This is the number one cause of eye shadow fallout.
- Mistake #2: Not using a primer before applying powder eye shadow. Primer is crucial for longevity and preventing fallout.
- Mistake #3: Applying dark eyeshadow too high or too low. This can distort the eye shape.
- Mistake #4: Buying nude shades that "match" your skin tone. You're better off reaching for something metallic to make your eyes stand out.
- Mistake #5: Skipping shadow underneath your eyes. This area can add definition and complete the look.
- Mistake #6: Limiting your eye makeup to traditional eye shadow products only. Experiment with other products for unique effects.
- Mistake #7: Forgetting to blend. Harsh lines can make the makeup look unpolished.
- Mistake #8: Using only a makeup brush to apply eye shadow. Your fingers can be excellent tools for certain applications.
Be creative, experiment with different techniques, and find what works best for you and your eye shape and color!