Basements are often susceptible to water seepage, especially if the walls are not properly sealed. In order to prevent water from entering your basement, it is important to use a high-quality waterproofer. The most important reason to properly waterproof your basement is to prevent water damage, as it can structurally compromise your home, as well as promote the growth of mold and other allergens. Another reason to waterproof your basement is to keep pests out. If you have a wet and inviting environment, you are likely to attract mice, rats and other rodents.
Identifying Causes of Basement Dampness
Why is your basement damp? The answer often lies in understanding the main moisture sources. It’s a common misconception that basements are naturally damp. In reality, the dampness is usually due to specific causes.
External Moisture Sources
The first cause could be external. Rainwater or melting snow can seep through your home’s foundation, creating a moist environment in your basement. Groundwater can also rise through the basement floor, adding to the dampness. If you live in a region with high humidity, the air itself can be a major moisture source.
Internal Moisture Sources
Now, let’s look inside your house. Any leaks from your plumbing can contribute to a damp basement. Also, activities like cooking, bathing, and washing clothes create a lot of moisture that can make its way to your basement.
The Importance of Proper Basement Waterproofing
Addressing the dampness isn’t sufficient; effective basement waterproofing plays a pivotal role in maintaining a healthy and dry basement. It’s not just about making the space habitable, but also about preserving your home’s structural integrity.
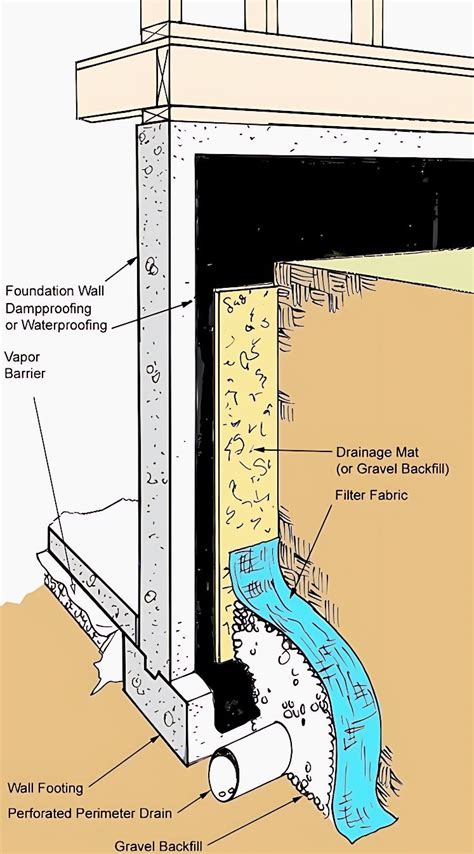
When you waterproof your basement properly, you create moisture barriers that prevent water from seeping into the basement walls. These barriers can be applied externally or internally, but their primary function is to block excess moisture, ensuring it doesn’t compromise the strength and stability of your basement walls. Another key component of basement waterproofing is the installation of an interior drainage system. This system is designed to collect any water that may accumulate inside your basement and channel it away from the structure. Without this, any water that does find its way in could cause significant damage over time.
Proper basement waterproofing is a critical step in basement maintenance and should never be overlooked. It’s not about merely managing the symptoms of a damp basement, but addressing the root cause. It’s a preventative measure that can save you considerable time, money, and stress in the long run. So, don’t underestimate the importance of getting it right. It’s more than worth the investment.
Overview of Basement Paints and Coatings
While waterproofing your basement is a fundamental aspect of its maintenance, the selection of appropriate basement paints and coatings is another integral component. These paints not only enhance your basement’s aesthetic appeal but also protect its surfaces from moisture and dampness.
Types of Basement Paints and Coatings
When it comes to paint types, you’ve got a plethora of options. Here are some of the most common ones:
- Acrylic paint: Known for its excellent adhesion and durability.
- Epoxy paint: Provides a hard, durable coating, resistant to water penetration.
- Latex paint: Easy to apply and dries quickly, but not as durable as other types.
- Oil-based paint: Extremely durable, but requires a longer drying time.
- Waterproofing paint: Specifically designed to resist water penetration.
Each paint type offers a specific set of benefits, and the choice largely depends upon your specific needs and the condition of your basement walls. Always remember, the coating durability is just as important as the paint type. A durable coating can withstand harsh conditions and extend the life of your paint job, saving you money and hassle in the long run.
Top Paints and Coatings for Damp Basement Walls
Now, let’s take a closer look at the top paints for damp basement walls. You’ll need to understand the problems associated with damp basements, as well as how to select the right paint to address these issues.
Understanding Damp Basement Problems
Basement walls often bear the brunt of dampness, a silent and persistent problem that can cause significant damage over time. Understanding where this dampness originates is crucial to remedying the issue. The root causes are typically moisture sources, which can be internal or external.
Internal moisture sources might include condensation from appliances or plumbing leaks. External sources could be rainwater seeping in through foundation cracks or ground water rising due to poor drainage. Ventilation solutions play a significant role in managing dampness. Basements with poor ventilation can trap moist air, exacerbating the problem.
To tackle damp basement problems, you need to:
- Identify the moisture sources, both internal and external
- Inspect for any structural damage or cracks where water might seep in
- Evaluate your current ventilation and consider upgrades if necessary
- Monitor humidity levels regularly
- Consider professional help if the problem persists
Selecting the Right Basement Paint
Choosing the right paint for your damp basement walls can be a game changer. When selecting paint, it’s crucial to consider both the finish and color. The finish you choose can drastically affect the durability and maintenance of your walls.
Most experts recommend a satin or semi-gloss finish for damp basements. These finishes are resistant to moisture, easy to clean, and help to reflect light, making your basement appear brighter. Avoid matte finishes as they tend to absorb moisture, exacerbating dampness problems.
Color considerations also play a significant role. Light colors like white or beige can make your basement feel larger and more inviting. They also reflect light well, reducing the need for extra lighting. However, don’t shy away from darker colors if they suit your aesthetic. Just ensure you balance them with adequate lighting to prevent your basement from feeling enclosed.
Best Coatings for Damp Basement Walls
When it comes to tackling the issue of dampness in your basement, the right type of coating can make all the difference. One of your best options is a moisture-resistant coating. These types of coatings are specifically designed to withstand high levels of moisture that are often found in basements. They’ll help to prevent water from penetrating your walls, thus keeping your basement dry and free from dampness.
Another excellent choice for damp basements is a coating that offers mildew prevention. This type of coating contains special additives that help to prevent the growth of mold and mildew, which are common problems in damp basements. This not only helps to keep your basement looking clean and fresh, but also significantly improves the air quality in the space.
In addition to moisture-resistant and mildew prevention coatings, you might also consider a coating that offers a combination of these features. These types of coatings offer the best of both worlds, providing comprehensive protection against moisture and mildew.
Limitations of Standard Waterproofing Paints and Advanced Solutions
While standard waterproofing paints offer surface-level moisture resistance, they are not designed to address deeper structural issues or severe water exposure. Surface coatings only create a superficial barrier, leaving cracks, gaps, or joints vulnerable to moisture penetration. In these cases, a more robust, comprehensive solution is needed.
What Standard Waterproofing Paints Offer
Standard waterproofing paints like KILZ, DRYLOK, and Zinsser are primarily designed to provide surface-level protection against moisture infiltration. They excel at creating water-resistant coatings that help repel water from masonry surfaces and inhibit the growth of mildew. However, these coatings remain on the surface, offering limited ability to bridge cracks, adapt to structural shifts, or withstand continuous exposure to hydrostatic pressure. Their effectiveness is often short-term and dependent on frequent maintenance or reapplication.
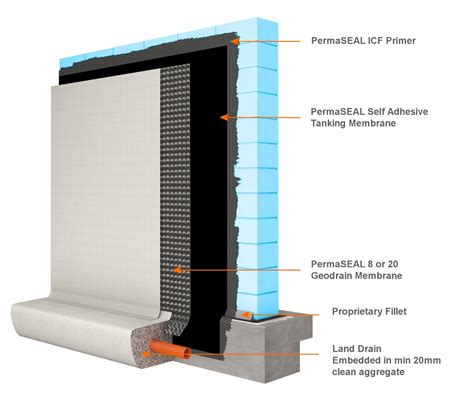
Why Advanced Solutions Offer Superior Protection
Polyguard’s advanced waterproofing systems provide reliable protection for below-grade surfaces by addressing challenges that standard coatings cannot overcome. While conventional waterproofing paints offer surface-level moisture resistance, Polyguard’s solutions are designed to handle hydrostatic pressure, structural shifts, and prolonged exposure to moisture. Their membranes and liquid-applied systems create continuous, durable barriers that actively prevent moisture intrusion and maintain effectiveness over time. Unlike standard coatings, Polyguard’s systems are engineered to bond directly to substrates and form flexible, resilient barriers capable of adapting to structural changes. This ability to maintain structural integrity under various conditions makes Polyguard a superior choice for comprehensive moisture protection, ensuring long-term durability and performance where other solutions fall short.
Preparation and Application Tips
Proper application of basement paint can be a game-changer in combating dampness. However, it isn’t as simple as grabbing a brush and bucket. Surface preparation, the right paint, and effective drying techniques all play a crucial role.
Surface Preparation
Ensure the wall is clean and free of loose material. Use a wire brush to remove any old paint or debris. Fill in any cracks or holes with a suitable filler. Test for loose, flaking concrete by pressing a piece of masking or cellophane tape at various places, then pull it off with an abrupt action. If the tape does not pull the concrete from the surface, it can be painted. If the existing concrete is removed, the loose concrete should be removed down to a sound substrate.
For above-grade application: Remove mildew stains with a mildew stain removing product. All surfaces must be clean and free of dirt, dust, efflorescence, and oil.
Primer Application
Apply a high-quality primer to provide a good base for the paint. It helps to seal the wall and improve the adhesion of the paint.
Paint Selection and Application
Choose a paint specifically designed for basements. They’re formulated to resist moisture and provide a durable finish. Apply the paint evenly with a brush or roller. Be sure to cover every nook and cranny.
DO NOT DILUTE. Stir well before use. Apply to dry or slightly damp masonry walls. A minimum of two coats are required:
- First Coat: Using a brush or roller, work the waterproofer onto the surface until any all pores or voids are covered.
- Second Coat: Using a brush or roller, cover the entire surface. Properly fill any voids left after the first coat.
Important: If leaking is still present after two coats, it indicates that voids or pinholes are still open.
Drying Techniques
Allow the paint to dry thoroughly before adding another coat. Use fans or dehumidifiers to speed up the drying process if necessary. Wait 1 hour to dry to touch; 4 hours to recoat. Low temperatures or high humidity conditions will affect drying time. Full cure should be reached in 7-14 days.
Common Mistakes to Avoid
Plunging headfirst into a basement painting project without understanding the potential pitfalls can lead to disappointing results. Common misconceptions and preparation pitfalls often lead to these errors.
- Neglecting preparation: It’s essential to clean and prime your walls before applying paint. This step ensures that the paint sticks properly and lasts longer.
- Using the wrong paint: Not all paints are suitable for basement walls, particularly if they’re damp. Use a paint specifically designed to withstand such conditions.
- Applying too few coats: For a basement wall, you’ll likely need more coats than you’d use for other walls.
- Rushing the job: Take your time to do it right.
| Common Mistakes | Solutions |
|---|---|
| Neglecting preparation | Clean and prime walls |
| Using wrong paint | Use paint for damp walls |
| Applying too few coats | Apply more than normal |
| Rushing the job | Take your time |
Long-Term Maintenance of Painted Walls
Now that you’ve chosen the perfect paint for your damp basement walls, let’s talk about long-term maintenance. Regular cleaning, addressing peeling paint, and scheduled inspections are crucial to maintaining the integrity of your painted walls.
Routine Wall Cleaning Tips
Embrace the routine of cleaning your painted basement walls, a task that significantly extends the lifespan and maintains the visual appeal of your paint job. Dust and grime can accumulate over time, dulling the color and causing damage if not addressed. Your wall maintenance routine should involve the use of gentle cleaning solutions. Harsh chemicals can potentially strip the paint or discolor the surface. Also, always remember to spot test your cleaning solution on a small, hidden area first to ensure it won’t harm your paint.
Here are some detailed steps to follow:
- Dust the walls: Use a microfiber cloth or a vacuum with a brush attachment. This helps to remove loose dust particles that may scratch the surface during cleaning.
- Test your cleaning solution: Apply it to a small, hidden area first to ensure it’s safe for your painted walls.
- Wash the walls: Use a soft sponge or cloth dampened with your cleaning solution. Work from top to bottom to avoid drip marks.
- Rinse and dry: Rinse with clean water and dry thoroughly to prevent moisture damage.
- Inspect and touch up: Look for any damage or areas that may need a touch up.
This routine care protects your investment and keeps your basement looking its best.
Addressing Peeling Paint Issues
A staggering number of homeowners often overlook the importance of long-term maintenance for their painted basement walls. Ignoring peeling paint issues can lead to bigger problems, impacting your wall insulation and overall home comfort. One of the first steps to addressing these concerns is ensuring proper surface preparation. It’s crucial to understand the conditions of your substrate. Check for dampness, as moisture can hinder paint adhesion, leading to peeling. Installing moisture barriers and focusing on vapor control can keep your walls dry, enhancing the durability of your paint. The choice of paint types greatly affects coating durability. Oil-based paints, for instance, are known for their excellent adhesion and resistance to environmental factors. However, they require specific application techniques for the best results. Remember that poor paint adhesion can also result from environmental factors such as high humidity or temperature fluctuations. Therefore, monitor these conditions to prevent peeling.
Scheduled Inspection and Repairs
Proactive vigilance is your best tool in the long-term maintenance of painted basement walls. Creating an inspection checklist and sticking to a repair timeline can help ensure your walls stay in top shape.
You need to:
- Regularly examine your walls for signs of dampness, mold, or peeling paint.
- Take note of any cracks or other signs of structural damage.
- Check if the paint is still adhering properly to the wall.
- Conduct a thorough inspection after significant weather events, like heavy rains or floods.
- Follow a strict repair timeline, addressing any issues promptly.
The inspection checklist isn’t a mere suggestion; it’s a must. It’s crucial to catch issues early before they become serious problems. A repair timeline, on the other hand, ensures you’re taking action in a timely manner. This isn’t just about maintaining the aesthetic appeal of your basement, but also about preserving its structural integrity.
Frequently Asked Questions
Can Damp Basement Walls Affect My Home’s Overall Structural Integrity?
Yes, damp basement walls can indeed affect your home’s structural integrity. Moisture management is key to maintaining structural safety. If left unchecked, the persistent dampness can weaken the foundation, leading to cracks and instability. Over time, this can compromise your home’s structural integrity. So, it’s important to tackle the issue head-on. Use effective solutions like sealants or waterproof paint to protect your basement walls from dampness.
What is DRYLOK® Masonry Waterproofer?
DRYLOK® Masonry Waterproofer is a product designed for waterproofing masonry and concrete surfaces. It can be applied to the positive or negative side (below-grade inside or outside) of the wall, during construction or after the build. Above and below grade masonry-including cinder and concrete block, stucco, brick, and bare concrete swimming pools-are all examples of applications where DRYLOK® is ideal.
What is the Warranty for DRYLOK® Products?
When applied according to directions, DRYLOK® Original Masonry Waterproofer is warranted for 10 years, DRYLOK® Extreme Masonry Waterproofer is warranted for 15 years, and DRYLOK® Floor & Wall Masonry Waterproofer is warranted for 7 years.
Can DRYLOK® be Used on Floors?
DRYLOK® Extreme and DRYLOK® Original Masonry Waterproofers are not formulated for floors. You can use DRYLOK® Floor & Wall Masonry Waterproofer on floors and walls.
Can DRYLOK® be Applied Over Existing Paint?
Yes and no. DRYLOK® may be used over any other cementitious-type waterproofing paint in good, repaintable condition, either inside or outside. However, DRYLOK® cannot be used over an oil or latex-based paint on the inside of a building.
Is DRYLOK® Masonry Waterproofer Recommended for Use on Anything Other Than Bare Masonry?
DRYLOK® Masonry Waterproofer is not recommended for use on anything other than bare masonry and concrete surfaces.
Is DRYLOK® Masonry Waterproofer Ideal as a Foundation Waterproofing Coating?
Yes, DRYLOK® Masonry waterproofer is ideal as a foundation waterproofing coating.
Can DRYLOK® be Used as a Base Coat?
Absolutely. In fact, DRYLOK® makes an ideal base coat.
Does DRYLOK® Come in Colors?
Yes! Plus, in addition to being a terrific timesaver, DRYLOK® is available in a range of colors to help you add personality to your basement, workshop, laundry room, and other living areas. DRYLOK® Original Masonry Waterproofer’s sandy finish is available in 4 ready-mixed colors (blue, white, gray, and beige) and 6 tints (buttercup, mint green, platinum, sand, slate blue, and soft pink).
Does DRYLOK® Extreme Prevent Mold and Mildew?
No, the biocide in DRYLOK® Extreme that prevents mold and mildew growth may harm aquatic life.
What are the Coverage Rates for DRYLOK®?
Coverage is 75-125 Sq. Ft./Gal. depending on application method and substrate porosity. Rough surfaces: 75-100 sq. ft; Smooth surface 100-125 sq. ft.
What are the Application Temperature Recommendations?
For best results, apply at temperatures between 40°F - 90°F. Temperatures above 90°F may affect the application such as drying too fast. Avoid applying in direct sun.
What are the Cleaning Instructions for Equipment?
Clean equipment and paint spatters with warm, soapy water.
What to do in case of a Spill?
If spilled, contain material and remove with an inert absorbent. Do not dispose of this product down a drain.
What are the Warnings Regarding Lead Dust?
IMPORTANT! If you scrape, sand, or remove old paint, you may release lead dust. LEAD IS TOXIC. EXPOSURE TO LEAD DUST CAN CAUSE SERIOUS ILLNESS, SUCH AS BRAIN DAMAGE, ESPECIALLY IN CHILDREN. PREGNANT WOMEN SHOULD ALSO AVOID EXPOSURE. Wear a NIOSH approved respirator to control lead exposure. Clean up carefully with a HEPA vacuum and a wet mop.
What are the General Safety Precautions?
CAUTION! Sealed surfaces may become slippery when wet. CAUTION! HARMFUL IF SWALLOWED. CONTAINS: ETHYLENE GLYCOL. MAY CAUSE EYE, NOSE AND THROAT IRRITATION. AVOID CONTACT WITH SKIN AND EYES AND AVOID BREATHING OF VAPORS AND SPRAY MIST. WEAR EYE PROTECTION AND PROTECTIVE CLOTHING. USE ONLY WITH ADEQUATE VENTILATION. To avoid breathing vapors and spray mist, open windows and doors or use other means to ensure fresh air entry during application and drying. If you experience eye watering, headaches or dizziness, increase fresh air and use a properly fitted respirator (NIOSH approved for organic vapor with P Series particulate prefilter). Obtain professional advice before using. A dust mask does not provide protection against vapors. Avoid contact with eyes and skin. Wash thoroughly after handling.