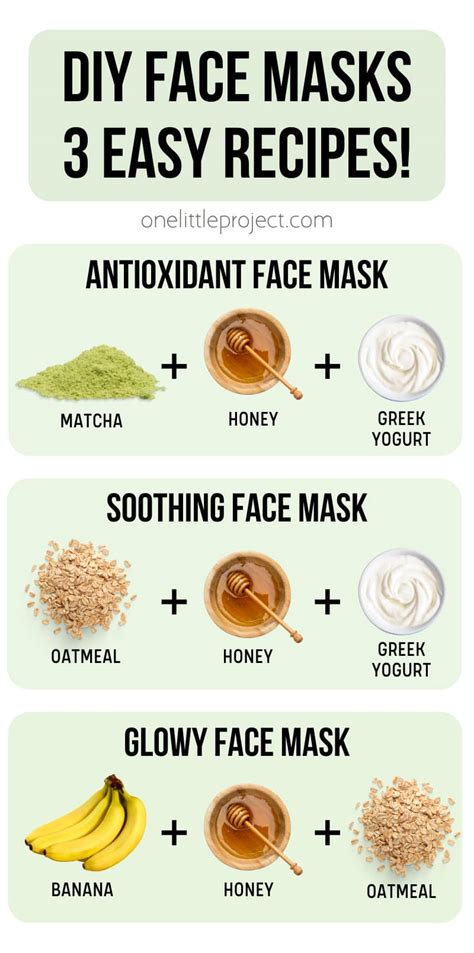
Creating a simple DIY face mask at home can be a fantastic way to achieve unclogged pores and radiant skin without resorting to harsh chemicals. Making your own "mud masks" or clay masks is not only effective but also a cost-efficient alternative to expensive beauty products. While you cannot physically shrink pores, you can effectively clean them by removing the buildup of dirt and debris that makes them appear larger.
Clay masks are particularly beneficial for those struggling with acne, as they can absorb excess oil and bacteria. Incorporating a clay mask into your weekly skincare routine can lead to significant improvements. Several types of clay can be used, each offering unique benefits:
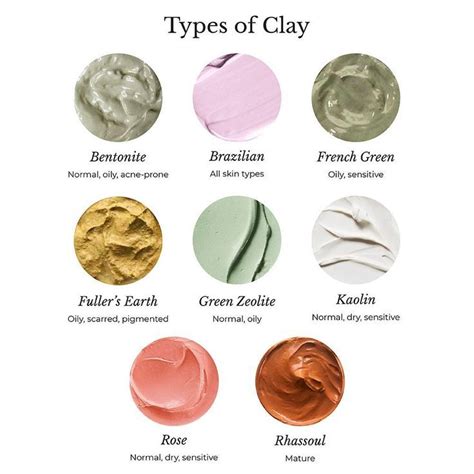
Types of Clay for Face Masks
- Bentonite Clay: This is a popular choice for many skincare recipes due to its electrical charge, which aids in absorbing toxins. It's important to note that metal tools should not be used when handling bentonite clay.
- White Kaolin Clay: A gentle, white-colored clay known for its deep cleansing and exfoliating properties.
- French Green Clay: Mined from natural deposits in France, this green clay is recognized for its toning and detoxifying capabilities. It also helps stimulate blood flow to the skin as it dries.
- Rose Clay (Pink Kaolin): This dusty, rose-colored clay derives its hue from iron oxide content. It is a gentle option for cleansing, exfoliating, and reducing inflammation.
The following recipes are designed for single-use DIY projects and do not have a shelf life, meaning you'll need to mix your preferred mask just before application.
Benefits of Clay Masks and Add-ins
Clay masks offer a multitude of benefits for the skin. For instance, activated charcoal is a natural ingredient known for its detoxifying properties. When removing the mask, rinsing with a warm washcloth is recommended; rinse the cloth and wipe your face as needed until fully removed.
Additional ingredients can enhance the mask's effectiveness:
- Honey and Aloe Vera Gel: These are excellent additions for acne-prone skin, providing soothing benefits.
- Yogurt: Rich in fatty acids, beneficial bacteria, vitamins, and minerals, yogurt can soften the skin, leaving it with a rejuvenated and glowing appearance.
One user shared their positive experience, stating, "The mask worked well for me. Thank you. I love the oat and clay mask recipe. Thank you so much for sharing it! I think the oatmeal really soothed the usual irritated feeling I get with a clay mask."
How to Use and Customize Your Clay Mask
After applying your clay mask, it's essential to follow up with a hydrating moisturizer to keep your skin nourished.
To prevent the mask from drying too quickly and flaking, mist your face with water or witch hazel using a spray bottle. This will help keep the mask moist.
While the recipes typically yield enough for a single application, you can prepare multiple batches and store them in an airtight container for up to 2-3 days.
Frequently Asked Questions About Clay Masks
How long should I wear a clay mask?
The recommended duration for wearing a clay mask is 5-15 minutes, depending on your skin's sensitivity.
Can I add essential oils to a clay mask?
Yes, you can. Lavender essential oil is a good choice for its calming properties, while tea tree essential oil is beneficial when dealing with breakouts. Always choose an essential oil that suits your specific skin needs.
Can you make DIY face masks without clay?
Absolutely. You can create effective masks using ingredients like yogurt and honey, or just yogurt alone.
Does clay contain heavy metals?
Clay is a natural earth element and may contain trace amounts of metals.
What should I apply on my face after using a clay mask?
After removing the mask, wait a few minutes for your skin's pH to rebalance, then apply a natural moisturizer.
Do I need to remove makeup or wash my face before applying a clay face mask?
Yes, it is always necessary to remove makeup and cleanse your face thoroughly before applying any mask.
Basic Clay Mask Recipe and Application
To make a DIY face mask that unclogs pores and leaves your skin glowing, begin by combining your chosen ingredients in a small bowl.
How to Use:
- Apply a thin layer of the mask to your face and neck using your fingers or a brush.
- Allow the clay to dry for 5-15 minutes.
- Rinse off with a warm washcloth, rinsing the cloth and wiping your face as needed until entirely removed.
- After rinsing, apply your favorite natural moisturizer.
You can customize this basic mask by adding ingredients such as honey, activated charcoal, yogurt, essential oils, witch hazel, or oats. Learning to make your own body and beauty products with simple ingredients can be a rewarding experience.
Understanding the Science Behind Mud Masks
Mud masks, often referred to as clay masks, have been used in skincare for thousands of years. Legend has it that Cleopatra herself used Dead Sea clay for her skin treatments. The effectiveness of these masks stems from the natural properties of clay.
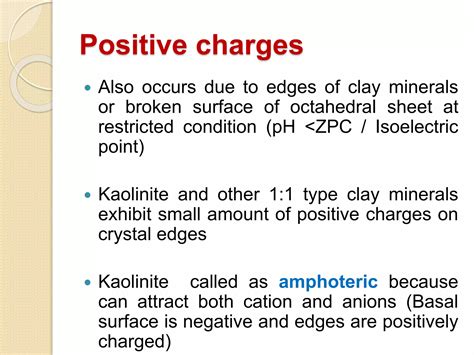
Clay is rich in essential minerals like iron, magnesium, sodium, potassium, and calcium. When water is added to clay, the H2O molecules interact with these minerals, giving the mixture a negative charge. This negative charge acts like a magnet, attracting positively charged impurities on your skin, such as toxins and free radicals that can clog pores.
In addition to drawing out impurities, clay can help seal and tighten the skin, potentially reversing some signs of aging. For enhanced anti-aging benefits, consider incorporating products designed to boost moisture and reduce wrinkle depth.
Choosing Your Clay and Customizing Your Mask
The first step in making a DIY mud mask is selecting the right type of clay, which is generally much more affordable than spa treatments. Various types of clay are readily available online.
Once you have your clay, you can begin to create your mask. Here are some ingredient ideas:
- Yogurt: Greek yogurt is particularly beneficial due to its citric acid content, making it ideal for oily skin.
- Honey: A natural antioxidant, honey is sticky but highly effective for retaining moisture in the skin and possesses anti-microbial and anti-bacterial properties.
- Fruits and Vegetables: Ingredients like cucumber, coconut, papaya, avocado, or strawberries can be incorporated.
- Whole Milk: The lactic acid in whole milk helps remove dead skin cells and excess oil.
- Aloe Vera: Known for its versatile benefits, aloe vera is a valuable addition.
- Green Tea: A potent antioxidant, green tea offers natural benefits in mud masks.
- Oats: Oatmeal can provide a soothing effect, especially for skin that tends to feel irritated by clay masks.
For those seeking a simpler approach, yogurt and honey masks, or masks made solely with yogurt, are excellent options. If a mixture seems too thin, a small pinch of additional clay can thicken it. Conversely, if it's too thick, a few extra drops of apple cider vinegar can adjust the consistency.
Advanced Clay Mask Formulation (for reference)
For those interested in more complex formulations, a recipe involving specific oils and emulsifiers might be considered. This type of recipe typically requires precise measurements and a controlled process:
Rose Clay Face Mask (Lotion-like Texture)
This recipe is designed for dry, mature skin and utilizes ingredients like rosehip seed oil, known for its rich vitamin A and C content, providing intense moisturization without greasiness. Chamomile extract is included for its soothing and anti-inflammatory properties.
Equipment Preparation:
Disinfect all utensils, including mixing containers, stick blenders, spoons, and spatulas, by soaking them in a 5% bleach water solution and allowing them to dry completely. This ensures the product remains free from germs, bacteria, and microbes.
Clay Preparation:
- In a small container, measure 3.5 ounces of kaolin clay and 1 ounce of rose clay.
- In a heat-safe container, combine avocado oil, rosehip seed oil, BTMS-50, and Polawax. Heat this mixture in the microwave using 30-60 second bursts until the waxes are fully melted. Handle with care as the container will be hot.
- In a separate large container, heat distilled water to approximately 160-170°F (71-77°C).
- Check the temperatures of both the oil/wax mixture and the water; each should be between 160°-180°F (71°-82°C). Reheat the oil/wax mixture if necessary.
- Place the stick blender into the heated water and "burp" it to remove air bubbles.
- Pour the oil and wax mixture into the water, using a spatula to ensure all of it is transferred.
- Begin pulsing the stick blender. The mixture will turn milky as the ingredients emulsify.
- Gradually add the clay mixture in heaping spoonfuls while continuing to pulse the stick blender until combined.
- Continue blending for 1-2 minutes, using a spatula to scrape down any clay from the sides of the bowl.
- Once the mixture reaches 130-140°F (54-60°C), add Optiphen, natural fragrance, and chamomile extract.
- Pour the mixture into bail jars. If bubbles appear on the surface, spritz with 99% isopropyl alcohol to reduce them.
- Allow the containers to cool for several hours with the lid open to prevent condensation. The final texture will be thick and lotion-like.
To Use:
Apply a medium layer to dry, clean skin, avoiding the immediate eye area. Let the mask sit for 10-15 minutes, then rinse off with warm water. Washing the skin afterward is optional.

Tips for Optimal Results
When making a face mask at home, consider that masks requiring the addition of water will have a shorter shelf life. However, recipes designed to be used directly without adding water can last longer. For instance, a recipe yielding six masks, used twice weekly, should be sufficient for a few weeks.
To maximize the longevity of your mask, avoid adding water, as it can introduce bacteria. Many homemade masks are inspired by popular commercial products, aiming for a similar balance of detoxifying and hydrating effects.
Indian Healing Clay is a common base ingredient known for its pore-cleansing abilities. Avocado oil offers nourishing benefits, while honey provides hydration and possesses antimicrobial properties. Homemade face masks can be stored in small glass jars and also make excellent gifts.
To use, apply a thin layer to your face and allow it to dry for about 10 minutes. Remove with warm water using gentle, circular motions, followed by your regular facial routine.
step by step guide to use clay masks the right way #facemask
This super hydrating and healing honey clay mask is simply amazing. Whip together the "wet" ingredients until smooth with a wooden utensil (everything except the clay). Add the clay and stir vigorously until completely smooth. Transfer to containers and enjoy!
To use: spread a thin, even layer over the face for 10 minutes. Enjoy a spa day at home with this easy-to-make moisturizing clay face mask.
Making DIY face masks is surprisingly simple and highly beneficial for maintaining healthy skin. European clay powder, derived from decomposed plant minerals from volcanic action, becomes activated with water, releasing nutrients that provide excellent cleansing for all skin types. You can then customize the mask based on your desired skin benefits. The cooling sensation upon application, followed by the removal with a warm washcloth, creates a truly feel-good, self-care experience. Enjoy your spa day at home!