Mascara clumping is a common beauty concern that can detract from an otherwise polished makeup look. When mascara clumps, it causes individual lashes to stick together, creating an undesirable spidery effect. Additionally, the base of your lashes may appear heavy or weighed down, and your lash line can look thick and bulky rather than soft and wispy. Clumpy mascara can also cause lashes to lose their curl, potentially making your lash line look droopy. While certain looks might embrace a messy, clumpy aesthetic, for most, it's an unintended and frustrating outcome.
Fortunately, there are ways to help prevent and, when necessary, fix unwanted clumping. Understanding the causes behind clumpy mascara is the first step towards achieving smooth, defined lashes.
Why Does Mascara Clump?
Several factors can contribute to mascara clumping, often related to application technique, product formula, or the condition of the mascara itself.
Common Culprits for Clumpy Mascara:
- Over-application: Layering on too much mascara is a frequent cause of clumps. While building up mascara for a desired look is common, there's a fine line between layering and caking on product.
- Expired Mascara: Mascara has a limited shelf life. Each time you open the tube and pump the wand, you introduce air, which can dry out the formula over time. Using expired mascara not only increases the likelihood of clumping but can also lead to clogged pores and skin irritation. Signs that your mascara may be expired include an off smell, discoloration, or an unusually sticky consistency.
- Product Buildup: If there's residue from previous makeup applications still on your lashes, adding more mascara can lead to clumps.
- Incorrect Formula: Using a mascara formula not suited for your lash type or desired effect can also contribute to clumping. For instance, a mascara intended for extreme volumizing might be more prone to clumping than a lengthening formula.
- Overloaded Wand: A mascara wand that is overloaded with product can deposit too much onto the lashes, leading to clumps.
How to Prevent Mascara Clumping
Preventing clumps is far more effective than trying to fix them later. Adopting the right application techniques and choosing the appropriate products can make a significant difference.
Application Techniques for Clump-Free Lashes:
- Curl Lashes First: Before applying mascara, use an eyelash curler to accentuate your lashes' natural curl. This step is especially beneficial for straight lashes and preps them for a curl-effect mascara application.
- Open Mascara Correctly: Avoid swirling or pumping the wand into the tube. Instead, twist the lid to remove the wand smoothly and swiftly. Swirling pushes air into the formula, causing it to dry out more quickly.
- Scrape Excess Product: If your mascara wand has picked up too much product, scrape any excess onto the inside of the mascara tube. This allows you to control the amount of product deposited onto your lashes, minimizing the risk of flaking or clumping.
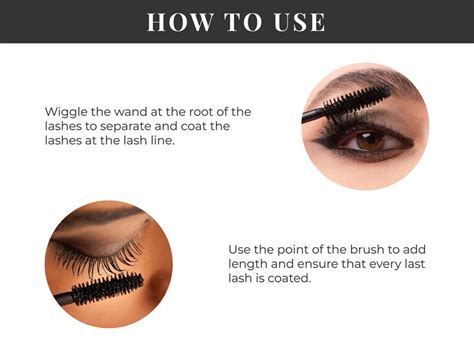
- Apply from Root to Tip: Tilt the mascara wand horizontally to mirror the natural curvature of your lash line. Brush as close to the root of the lash as possible and pull upwards towards the tip to ensure even coating. Looking upwards can help reach the very root of your top lashes.
- Wiggle and Separate: As you apply mascara, wiggle the wand from side to side through your lashes. This action helps to separate and define them, creating a more dramatic, fanned-out look.
- Use the Wand Vertically for Corners: Tilt the mascara wand vertically to use its tip for greater precision when coating the tiny hairs on the inner and outer corners of your lash line. This technique offers more control and reduces the likelihood of smudging.
- Apply to Lower Lashes: Don't forget your bottom lashes. Use the tip of the mascara wand with vertical, wiggling motions along your bottom lash line to coat each lash. Applying eyeliner along the bottom lash line can help it appear thicker and more dimensional.
- Don't Layer Too Quickly: Allow each coat of mascara to dry for at least 30 seconds before applying the next. Layering mascara when it's completely wet can fuse lashes together, leading to a clumpy and messy appearance.
- Less is More: Consider applying fewer coats. While you might desire dramatic lashes, excessive strokes can cause product buildup and spidery lashes.
Choosing the Right Products:
- Use a Lash Primer: Applying a lash primer before mascara can set your lashes up for clump-free success. Primers can help thicken lashes, hydrate them, and provide a base for mascara, potentially requiring fewer coats.
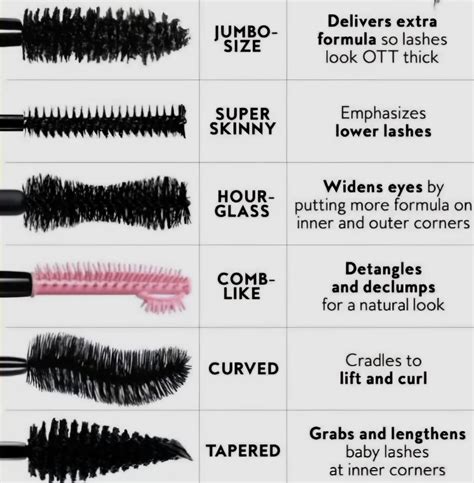
- Opt for a Slimmer Wand: A slimmer wand generally offers more control and allows for precise application, reducing the chance of clumping compared to large, fluffy brushes.
- Consider Formula Types:
- Lengthening Formulas: These tend to clump less than volumizing formulas.
- Buildable Mascaras: Formulas designed to be buildable allow for multiple coats without clumping.
- Tubing Mascaras: These polymer-based mascaras wrap around individual lashes, extending them and are known for being smudge-resistant and clump-free.
- Use a Clean Spoolie or Lash Comb: A clean spoolie or lash comb is invaluable. You can use it to brush through lashes before applying mascara to ensure they are separated, or after application to comb out any developing clumps.
- Keep an Old Spoolie Handy: Carrying an old, clean mascara spoolie in your bag allows you to comb through lashes and address clumps throughout the day.
How to Fix Clumpy Mascara
If you find yourself with clumpy lashes, don't despair. There are methods to salvage your mascara application.
Fixing Clumps:
- Comb Through While Damp: If your mascara clumped because you applied too many coats, grab a clean, dry spoolie and comb through your lashes before the mascara has a chance to fully dry. This helps lift layers and separate lashes, breaking up chunks.
- Use Micellar Water: Once mascara is dry and clumpy, it's harder to fix. However, micellar water can help. Dip a clean spoolie brush into micellar water and brush it through your lashes from root to tip. This can help lift some layers of mascara and reduce clumpiness.
- Remove and Reapply: If clumps are severe, or if you suspect the mascara is expired, the best solution might be to remove it entirely. Use a makeup remover wipe or pad to gently remove the mascara. Once your lashes are dry, you can reapply your mascara, taking care to use a smoother technique.
- Gentle Removal: Ensure you completely remove mascara at the end of the day. Leftover residue can cause clumping the next day. Use an oil-based makeup remover or micellar water to dissolve stubborn mascara, especially waterproof formulas.
Tips for Specific Mascara Effects
Achieving specific lash looks without clumps involves tailored techniques.
Applying Mascara for Length:
- Grip each individual hair with your mascara wand and coax them outwards.
- Move your mascara wand towards the outer corner of your eye as you apply to create a fanned-out appearance, giving the illusion of longer, wispier lashes.
Applying Mascara for Volume:
- Volume is built up with multiple coats. Apply your mascara generously.
- Focus volume application at the center of your lashes. Applying too much to the corners can create a spidery look.
- Applying mascara right down to the root helps your lash line appear thicker and more voluminous.
Applying Mascara for Curl:
- Use an eyelash curler before mascara application to shape your lashes.
- As you sweep the mascara wand from root to tip, delicately roll your wrist in an upward curve to guide lashes into a more pronounced curl.
- If clumps form, use a clean cotton bud or spoolie to brush through lashes and remove excess mascara, as clumps can weigh lashes down and cause them to lose their curl.
Applying Mascara for Separation:
- Brush through your lashes with a clean spoolie or lash comb before applying mascara to ensure they are separated.
- Utilize the tip of your mascara wand as a styling tool for precise application, especially for hard-to-reach lashes.
- Be mindful of very wet mascara formulas, which can cause lashes to stick together and diminish the separating effect.
Applying Mascara to Bottom Lashes:
- Powder underneath your eyes with a setting powder before applying mascara to your bottom lashes. This forms a barrier and helps prevent mascara mishaps.
- Use the tip of your mascara wand horizontally for precise application on bottom lashes, avoiding smudging and applying too much product.
- Focus mascara application on the outer corners of your lower lash line to create a more lifted, cat-eye effect, as applying to the inner corners can make eyes appear smaller.