Makeup is a wonderful form of expression, a confidence booster, and a clever way to enhance your best features, whether it be sparkly eyes or chiselled cheekbones. At LOOKFANTASTIC, we love how transformative makeup can be and so we constantly have our fingers on the pulse searching for the latest innovations in formulation from our favourite makeup brands. When it comes to makeup application, half of the fun is in trying out different looks and different products, practising techniques and seeing what works for you and your skin. And whilst there are no set rules on how you apply your makeup, if you follow our easy routine, you can guarantee a flawless professional finish.
Applying your products in the right order is key to a seamless, lasting makeup look. Some orders of makeup application work better for different skill levels or specific goals, and timing can change based on the look you are trying to achieve. Still, there is a general rule of thumb that fits most routines, especially for beginners, because completing certain makeup steps before others helps products blend smoothly and wear evenly. Use the steps below as your everyday baseline, then tweak placement or intensity as you get more comfortable.
Step 1: Prepare Your Skin
The first step is not even about makeup; it’s about skincare! For a flawless makeup application, it really does make such a difference if your skin is properly prepped. Skincare is like brushing your teeth; you do it at least twice a day, morning and evening before bed. You want your skincare routine to do a lot of the heavy lifting in terms of your skin goals. Preparing your skin for makeup may look different depending on the day, how much sleep you had, the weather, and the nature of the day.
Cleanse Your Skin
Begin by washing your face with your favourite cleanser and a warm flannel to remove any oil and dirt from your skin, as well as any traces of old makeup such as stubborn mascara or eyeliner. Remove any makeup that you might have slept in, or wash off makeup from earlier on in the day. If you try to apply more makeup over the top of old makeup, your end look will appear caked on and more unnatural than makeup put on a fresh face. You also need to cleanse any makeup residue to keep your skin from getting clogged and irritated. Wash your face, then follow with moisturizer. Use a mild facial cleanser to gently wash your face, spending about one minute of massaging to remove all bacteria and dead skin cells in your pores before rinsing with cool water.
Moisturise Your Skin
Now that your skin is freshly cleansed, you can move on to applying moisturiser. Moisturiser is like a refreshing drink of hydration for your skin, making it look instantly brighter, plumper, and more radiant. Depending on your skin type, you may prefer to use a face serum, facial oil, or a face mist. Whatever your chosen formulation, ensure you don’t miss out this step to complete your preparation ready to apply makeup. Serums containing hyaluronic acid help hydrate and plump oily skin without adding extra oils, while ceramide-rich serums work amazing for those with more dry complexions. As for moisturizer, water-based gel-creams will be a game-changer for combo or oily skin, and richer creams will make even the driest skin glow. Celebrity makeup artist Matin Maulawizada will even give the skin a little relaxing massage while working in the products. “I take the moisturizer and warm it up between the palms of my hands, and then massage it into the skin with upward and outward circular motions,” he says.
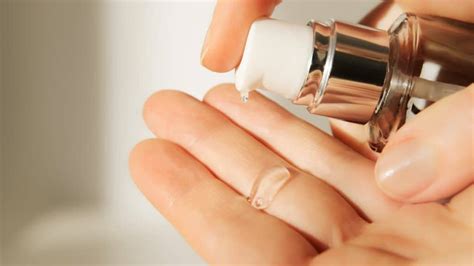
Apply A Primer
Once you’ve given your moisturiser time to soak into your skin, it’s time to prime your face with a makeup primer. Primer is a great base for foundation and ensures your base makeup applies smoother and lasts longer. Primer works by filling in any uneven texture, fine lines, and pores, creating a smooth canvas for makeup. Apply a pea-size amount of primer to your fingertips before working it into your skin around your cheeks, forehead, chin, and eyelids. Give your skincare a minute or two to fully absorb, then work a pea-size dollop of primer over your skin. Blend it all over or focus the product just in your T-zone, depending on the look you’re going for. If you have dry skin, look for a hydrating makeup primer. Those with oily skin should opt for an oil-absorbing or pore-blurring primer. Something to be mindful of is that the type of primer you use can affect the finish of the foundation. A primer with a glow can make the base look more airbrushed and have a softer lit-from-within appearance, whereas a more matte-textured primer can make the base appear more velvety.
Step 2: Apply Eye Makeup First (Pro Tip)
You probably didn’t expect us to tell you to apply your eye makeup first? This is a pro tip! When you apply eyeshadow, eyeliner, or mascara, it can transfer onto your base makeup causing smudges and imperfections in your perfectly applied foundation. By applying your eye makeup first, you can clean up any mess without affecting your base, genius!
Apply Eyeshadow
Eyeshadow application doesn’t need to be complex; you can keep it simple with a swoosh of one colour all over your eyelids, or mix it up by blending multiple shades together. If you’re going for a blended look, start by applying the lightest colour first, before sweeping a darker shade throughout the crease of your eyelid and over the lash line. Don’t forget to finish by blending with a clean, fluffy blending brush. For a makeup 101 routine, a soft, neutral wash is the easiest place to begin. For a quick, beginner-friendly option, swipe on a rich, creamy stick shadow that glides on evenly and builds easily. The most classic (and the easiest) eyeshadow look is to apply a single color over the entirety of your eyelid. For this, you can apply your preferred shade of eyeshadow with a brush (or finger, for higher pigmentation), starting in the center of your lid and blending outwards. Prevent harsh lines near your crease, and on the corners of your eyes by fading your eyeshadow into your natural skin tone. For some extra help, see our guided visual tutorial on applying eyeshadow. If you want a more defined look, it’s helpful to have a few darker shades around. The light shades similar to your skin tone act as a base. A darker shade creates shape and definition, as well as contours the eye. Shades in between are for the lids to marry the two seamlessly. Focus the darker shades on the outside corner of your lash line, moving upward to create a “C” shape. Then, use an in-between shade on a fluffy eyeshadow brush to blend them all together. As for those shimmer shades? Add them to the inner corners of your eyes to make them look big and bright.
Apply Eyeliner
Eyeliner can really enhance your eyes and can be used in a number of different ways to create many eye makeup looks from simple and chic to seriously sultry and smokey. If you’re new to eyeliner, choose a pencil eyeliner as the formula is typically softer, easier to apply and blend. It can also be applied to the tight line and the waterline, which are the rims of skin around your eyes. Always make sure your pencil eyeliner is sharpened to avoid snagging the delicate skin around your eyes. For a super precise line and for creating looks such as a winged cat eye, liquid eyeliner or gel eyeliner is best suited. Start from the middle of your eyelid and work your way outwards. The purpose of eyeliner is to provide the illusion of a fuller lash line; therefore, choose a colour that is similar to your natural hair colour (or brown if you have blond hair) to go along your lashes. For a smudgy look, use an eyeliner pencil, or create a sleek and smooth look by using cream or liquid eyeliner. Create a dashed or dotted line across your lash line, and then connect the dots to create a full, continuous line. One of the most important makeup tips for beginners when learning how to line your eyes is to think placement first. The lash line adds definition right where lashes meet the lid, making your eye makeup look fuller, even without a dramatic wing. Choose your liner format based on the finish you want. A felt tip is designed for crisp, precise lines, like liquid eyeliner or a classic kohl pencil eyeliner.
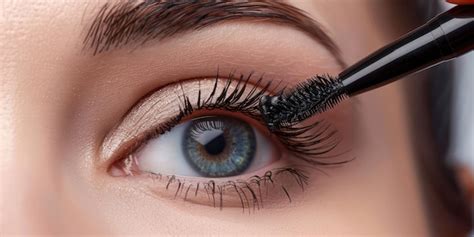
Apply Mascara
Whether you’re looking to achieve fluttery long lashes or voluminous fanned lashes, mascara can help transform your entire face. Available in neutral shades such as black or brown, or fun vibrant colours, mascara is the key to extra gorgeous eyes. Begin by using an eyelash curler to curl your lashes to define them and achieve beautiful Bambi eyes. Place the curler at the base of your upper lashes, being careful not to grab any of the sensitive skin around your eyelid. Close the curler gently, hold it in place for a few seconds, and release gently. Once you have curled your lashes, you can apply mascara, starting at the base of the lashes and brushing upwards towards the tip of your lashes. Apply multiple coats for volume, working any clumps out as you go. To complete your eye makeup, you’ll need to top off your eyes with a bit of mascara. There are several mascaras to choose from depending on the look you want; if you have short lashes, use a mascara that will add length, or if you have thin lashes, use a volumizing mascara. Dip the brush in the mascara once and lightly wipe off the excess onto the edge of the container or a paper towel. Looking straight forward, apply it to the top lash with upward strokes. Start with the inner part of your eye and work your way outward. Do both eyes with two coats, then let dry. Don’t forget to apply mascara to your lower lashes. Our lower lash lines are often neglected because we don’t want to draw attention to our under-eye area, especially as we age. But balance and symmetry in our eye makeup is important.
Step 3: Build Your Base Makeup
With so many ways to create a BEAUTIFUL makeup look, it’s natural to have some questions. Foundation should be one of the first steps in your makeup routine to give your makeup look a beautiful canvas! Once you’ve applied your colour corrector, apply your foundation, concealer, powder, bronzer, and highlighter. Then, you’re ready to create your supermodel brows!
Apply Foundation
Now that your eye makeup is done, it’s time to head back to base and apply some foundation. Make sure you’re using a foundation that correctly matches your skin tone. Need some help? Read our guide to finding the perfect foundation shade for your skin tone. Next, you’ll want to consider what formulation of foundation you prefer, whether it be liquid, powder, or stick foundation. To apply your foundation the expert way, start at the centre of your face and blend your foundation outwards. For the application, depending on the formulation you’ve chosen, as well as your personal preference, use a makeup sponge, a foundation brush, or your fingers to apply and blend. Foundation should be applied first to give overall coverage. Depending on the formula you use, you may be left with areas that need some extra coverage, and this is where concealer comes in! You never want a harsh line from your jawline to your neck. This is very unnatural and gives a harsh and unblended finish, which is not what you want. Keep in mind that your foundation should be the same colour as your natural skin tone, not much darker or lighter. It helps to match your foundation to your chest and neck so your face isn't a different colour than the rest of your body. If you’re struggling to choose a foundation type, consider your preferred look and your skin type. Mature skin or dry skin types should reach for a liquid foundation, as powder foundation can settle into fine lines and wrinkles. That said, powder foundation is a great option for oily skin types since it absorbs and controls excess oil. Those with combination skin can try out a liquid or powder foundation (or even a mixture of the two). Apply powder foundation in oily areas and a liquid formula in other areas of your face, or top off your liquid foundation with a dusting of powder foundation for a full-coverage and oil-free look. Just don’t pack them both on, since too much product will give you a cakey finish. Cream foundation tends to be heavier than liquid or powder foundations, which makes it great for full coverage looks. You might want to steer clear if you’re prone to breakouts, however, since cream formulas may clog pores. You should apply your foundation before your contour to create a SEAMLESS canvas for your contour makeup!
Apply Concealer
Concealer is designed to help even out your skin tone, cover blemishes, and camouflage aspects of your skin that you want to look less prominent. We recommend choosing a concealer that is the same colour as your skin tone to cover blemishes and redness, as well as a concealer that is lighter than your skin tone to cover dark circles and add luminosity to areas of your face. Apply your concealer with light touches (either with a concealer brush or fingers); don’t forget to set your concealer with a powder to avoid creasing. Discover our expert guide to applying concealer and how to cover blemishes, dark circles, and more. The purpose of concealer is to even out uneven skin tone as a result of blemishes or dark under-eye circles. You can also use a concealer in a shade slightly lighter than your skin tone to brighten dark areas or high points of your face. Use a concealer brush or your (clean) fingertips to blend concealer on your undereye area in an upside-down triangle shape, down the bridge of your nose, chin, the center of the forehead, and above the upper lip. Just like foundation, you can apply concealer with either a makeup brush, beauty blender, or just your fingers. (Note: A brush will give you a more full-coverage makeup look.) Still, when it comes to concealer, remember that a little goes a long way. You really only need to apply concealer to the areas you want to hide. Concealer is meant to even out your complexion, so pick a shade fairly close to your skin tone. Dot concealer under your eyes to cover dark circles, starting small and building up as needed to avoid looking cakey on the delicate skin around the eyes. Then, apply a little concealer to any blemishes, dark marks, or red spots, allowing the formula to set for a minute or two before blending and applying any type of powder on top. It’s also important to note different types of concealers and the purposes they serve. Concealers with a creamy texture are more versatile. You’ll be able to use them under the eyes and on other parts of the face, as they blend seamlessly into the skin. Richer and thicker formulations, like concealer in a stick or pot, are superb for covering spots and blemishes. If you opt for a creamy formula, pat in with clean fingertips or a makeup sponge. With richer stick and pot concealers, it’s worth investing in a precision concealer brush. These allow you to be very targeted with where you add the extra coverage. Once you have applied these types, dot gently with your brush to blend into the skin.
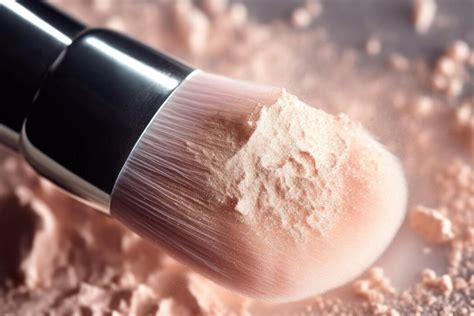
Apply Powder
Powder is a great way to manage shine and help your makeup last for longer. For this reason, it’s best to apply it after your foundation. This is an optional step, but if you’re looking for long-lasting, crease-free makeup, you should use a setting powder to hold your foundation and concealer in place. Use a damp beauty sponge to pick up loose powder and press into the under-eye area, then gently sweep off any excess with a brush. Use a large, fluffy brush to cover your whole face in a translucent or matching setting powder.
Step 4: Add Dimension and Colour
Once your base is in place, add dimension in a consistent order: bronzer, then blush, then highlighter. Start with bronzer to add warmth around the perimeter of the face and subtle definition under the cheekbones.
Apply Bronzer
Bronzer can add a gorgeous warmth to your face that mimics where the sun would naturally add colour. Not to be confused with contouring, bronzing is best applied to the high points of your face such as your forehead, cheeks, and the bridge of your nose. Always choose a bronzer that is 1-2 shades darker than your natural skin tone. Depending on whether you choose a powder bronzer or a cream bronzer, you can apply with a makeup sponge or an angled makeup brush. Bronzer is a super versatile makeup product because it can be used to contour or just add a burst of warmth to your skin, like you just got back from a beach vacation (minus the sun damage!). When applied as a contour to sculpt, you want to only add colour where there would be natural shadows on your face, like under your cheekbones, along your jawline, and on your forehead around your hairline. You can also use the contour to create the visual illusion of a recessed area if you’re trying to change the shape of your nose or fake the look of a shorter forehead. Contour should mimic the colour of shadow on your skin, so be careful not to choose a colour too deep for your skin tone, and opt for a cooler undertone. For traditional bronzer application, use the continuous 3-shape method, which adds colour in a 3-shape where the sun would naturally hit you. Swirl a fluffy powder brush in your bronzer, tap off any excess powder, then start on your forehead near your hairline. Sweep the brush out and down along your hairline and across the tops of your cheeks, then continue sweeping it back again toward your ears and then down along your jaw and chin. This technique refines the bone structure while simultaneously adding warmth. If you’re using a liquid formula, follow the same application and then buff out the product with a big bronzing brush.
Apply Blush
For a fabulously flushed cheek, you can count on blusher to deliver. If you prefer a powder blush, we recommend using a large, dense brush to apply blush to the apples of the cheeks (the front part of your cheek that becomes pronounced when you smile). If you prefer a cream blush formula, you can use your fingers or a makeup sponge, lightly pressing the colour onto the apples of your cheeks. After bronzer, you’ll want to apply blush to add back a bit of warmth to your face-only this time to strategic areas. Think the apples of your cheeks for a doll-like effect, tops of your cheeks and across the bridge of your nose for a sun-kissed look, or along your cheekbones and temples using the newly re-popularized draping technique. For draping, you take the blush higher than just the apples of your cheeks. It gives an incredibly vivacious look, really adding a pop of colour and also adding extra dimension to the face. Start at the apple of the cheek and sweep the brush higher towards the hairline in a teardrop shape. This draping technique works beautifully with cream, gel, liquid, and powder blush. While the blush placement you opt for works equally no matter the blush formula you choose, the applicator you use should differ. For a gel and liquid, use a soft makeup sponge. For a powder blush, use a soft fluffy cheek brush so you can blend the blush into the skin in a soft circular movement for an effortless look.
Apply Highlighter
Create a glowing, lit-from-within radiance with a highlighter. Highlighters are available as creams, powders, and liquids depending on the finish you’re looking for. For best results, highlighter is best applied across the tops of your cheekbones, underneath your brow bone, down the bridge of your nose, above your cupid’s bow, and the centre of your chin. If you ask us, no makeup look is complete without highlighter. You can go for either a swipe of highlighter so blinding you can see it from space, or a simple, natural-looking glow. Either way, highlighter will add dimension and keep your face from looking flat. Highlighters can be applied wherever you want to bring attention, like cheekbones or even clavicles. You can also brighten up the deepest areas of your face-like the inside corners of your eyes, underneath your eyebrows, or your cupid’s bow-to make your face look more bright and awake. Just like bronzer and blush, highlighter comes in a ton of different shades and formulas, like gels, liquids, powders, creams, and more, so the highlighter world is your oyster! Gels and liquid formulas will give you more of that lightweight dewy look, while powders and creams offer a long-lasting glow.
Step 5: Finish Your Look
With the completion of your face and eye makeup, your look is finished! Give yourself a once-over to make sure there aren’t any smudges or loose eyeshadow that needs to be removed with a fluffy brush.
Add Colour to Your Lips
Whether you prefer long-wearing lipstick, lip gloss, or a buildable balm, add some colour to your lips. Maybe you prefer neutral shades, perhaps your preference is pops of punchy colour; whatever you prefer, make sure you’ve applied a balm to your lips before applying your lip colour of choice to avoid it flaking off and accentuating any dry patches. If you want a more defined lip look, start with a lip liner to line the outer portion of your lips before filling in with colour. For a more diffused look, blot your chosen lip shade with your finger and apply a clear lip balm over the top. Lip makeup is something that can be really intimidating for people. There are so many different lip colours to choose from and it can seem hard to know which colours work for you. Then there are so many different types of products, from a basic lip balm to a lip gloss to a liquid lipstick-it can be hard to know which one will be right for you. We’ve all been in the situation where you want to try something different so you go to a beauty store and you start to test out all the bold, sexy colours. But there’s so many different versions of even a basic red. I firmly believe that you don’t have to wear a bold lip to have a put-together makeup look, but I don’t think you should leave them completely naked. You need to know where you want to go in order to get there. Before you can apply makeup confidently, you need to know where you’re going. You’ll need to determine for yourself if you want a more natural look or a more glamorous look. Keep in mind that a natural makeup application is going to require the same skills as a glamorous makeup look; it’s just going to be different colours and formulations for the most part.
Use A Setting Spray or Powder
Now that your beautiful makeup application is complete, don’t forget to lock in your look with a makeup setting spray and powder. Setting spray stops your makeup from creasing or becoming patchy and helps prevent unwanted shine. Simply hold the setting spray a couple of inches away from your face and spritz. Don’t be tempted to rub the formula in; just let it air dry. This is the final lock-in step in your makeup 101 order, helping your look stay fresh and finished. For oily or combination skin, set targeted areas like the T-zone and under-eyes with a loose powder designed to blur and extend wear. For dry skin, or when you want a more skin-like finish, use a setting mist to help meld layers and reduce the powdery look.
What is the difference between Makeup Setting Spray vs Fixing Spray? | Do you need both?
We hope you’ve found our step-by-step guide to applying makeup helpful and perhaps even picked up some new tips along the way. As you practice, the routine starts to feel more automatic, and that is when it becomes easier to personalize your look with confidence. Start by repeating the same default order until you fully learn how to apply makeup and steps feel familiar. Then experiment with one change at a time. Consistent tool care is one of the most important makeup routine tips. Old or dried-out products can affect both makeup performance and safety, leading to uneven application and irritating buildup. Along with tracking expiration dates, watch for cues like a changed smell, a separated formula, clumping, dryness, or a texture that drags instead of gliding.