Achieving an easy, breezy bronze makeup look, especially for the summer, is a goal for many. This tutorial shares everything you need to know to create that sought-after sun-kissed glow, from the essential products to the precise application order. Contrary to popular belief, a bronze makeup look is not difficult to achieve and can be completed in a series of simple steps.
Choosing the Right Bronzer
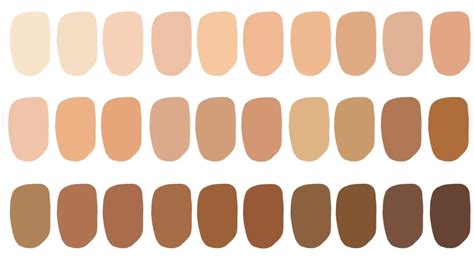
Selecting the best bronzer is highly dependent on your individual skin tone. The goal is to find a product that looks natural and imparts just the right amount of warmth and bronze. It's important to avoid bronzers that are too dark or too orange, as these can easily lead to an unnatural appearance, particularly for fair skin tones. For fair-skinned individuals, choosing bronzers that are slightly darker in pigment and color will ensure they show up effectively without looking stark. Conversely, bronzers that are too light may not be noticeable.
For medium skin tones, products like Westman Atelier’s Coup de Soleil are excellent. This bronzer is subtle, looks incredibly natural, and adds warmth to the skin without being overpowering, making it very easy to use.
Another fantastic option is Ilia’s NightlLite Bronzer in Novelty, a matte bronzer with no shimmer. It offers a slightly deeper shade than the Ilia bronzer recommended for fair skin. For those seeking a highly pigmented, matte bronzer that can also double as a contour product, MOB Beauty M37 Golden Brown Bronzer is a great choice, providing a natural yet defined look.
Preparing Your Skin for a Bronze Glow
Before applying any makeup, proper skin preparation is crucial for a flawless, long-lasting bronze look. A hydrated base is key to preventing patchy application and ensuring your makeup sits beautifully throughout the day. Using a water-based moisturizer is recommended to prep the skin.
For added radiance, consider using an illuminating primer. Products like Pure Canvas Primer Illuminating, which is infused with micronized pearls, can instantly boost skin radiance and brightness, with benefits that improve over time. This step enhances the overall glow and prepares the skin for makeup application.
Step-by-Step Bronze Makeup Application
Creating a radiant, sun-kissed makeup look can be achieved with expert-approved techniques. The process typically involves the following steps:
Step 1: Apply Your Base
Begin by applying your foundation, or a base and concealer, to even out your skin tone. For brightening the under-eye area and extending towards the cheekbone, Instant Full Cover Concealer (Sand) is effective. If additional coverage is needed, use a Foundation Stick (Natural) over those areas.
For a glowy foundation suitable for a bronzed look, consider a shade slightly warmer than your natural skin tone to enhance the tanned appearance. MAC Face and Body foundation is ideal for this purpose. This water-based, waterproof foundation can be used alone or as a base for heavier coverage. It's best applied with fingers; as it becomes tacky, you can build up coverage as desired. Blending the foundation down onto the neck and décolletage is recommended, especially when using a warmer shade. Its waterproof nature makes it suitable for application on the entire body, including legs, for added coverage and color.
Step 2: Conceal Imperfections
Conceal only the areas that require coverage, such as under the eyes, around the nose, and the chin area. These areas often have thinner skin and can show redness or darkness. Nars Radiant Creamy Concealer is a popular choice. Apply with the applicator and then use your finger to press and blend the product. Opt for a shade that matches your skin and foundation rather than a lighter one for highlighting, as this look focuses on a bronzed, sun-kissed appearance rather than strong highlighting and contouring.
Step 3: Set with Powder (Optional)
If needed, apply a powder sparingly to areas prone to shine, typically down the center of the face. Laura Mercier Translucent powder is a good option as it doesn't alter the color of your makeup. A small amount can also be applied to the hollows of the cheeks where bronzer will be applied.
Step 4: Apply Bronzer
Bronzing powder or a bronze blush is often preferred over cream bronzers for this look. Bronzers are typically too warm to be used as contouring products. For fairer skin tones, MAC Trace Gold blush offers a beautiful golden-bronze tone. For a warmer shade than your skin tone, MAC Mineralize Skinfinish in the shade 'Dark' works well for medium to dark skin tones, while 'Medium Deep' is a great shade for many bridal clients. This powder provides a natural finish with a slight glow, without glitter.
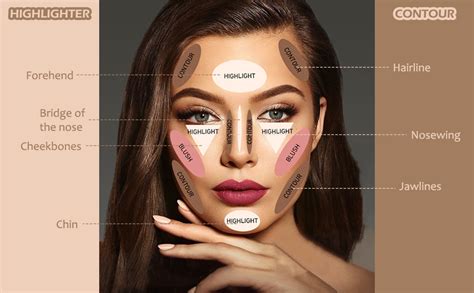
Apply bronzer using a blush brush (like the MAC 129) to the high-points of the face where the sun naturally hits: the bridge of the nose, forehead, hairline, and cheeks. A slightly smaller powder or blush brush is effective for precise application. A small amount can also be applied to the upper lip area and down onto the neck and décolletage.
Step 5: Add Blush
To achieve a natural, just-off-the-beach glow, apply blush to the apples of the cheeks. A slightly pink-toned blush often works well for brides, or choose a color that mimics the natural flush of your cheeks. For medium to darker skin tones, MAC Pinch Me, an earthy orange-brown shade, is excellent. Smile and apply blush to the raised apples of the cheeks using the same brush used for bronzer.
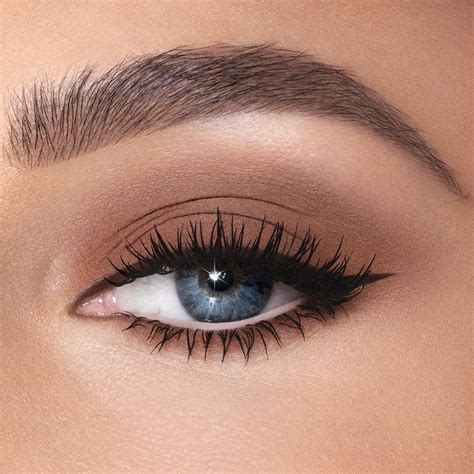
Step 6: Enhance the Eyes
As this is a skin-focused look, eye makeup is kept subtle. Apply an eye base, such as MAC's Laying Low Paint Pot, or use a Tarte Shape Tape concealer in your skin tone. Using a soft brush (like the MAC 217 or 224 blending brush), apply the same bronzing powder used on the skin into the eye socket for a subtle, cohesive look. Finish with mascara to separate and define the lashes. MAC Extended Play mascara is a good option.
For a more dramatic effect, a wash of molten bronze cream shadow stick over the eyelids, blended into the crease with fingertips, can create glistening lids in minimal time.
Step 7: Apply Highlighter
Highlight the high-points of the face where light naturally reflects. Be mindful not to overdo it, as highlighting accentuates areas. Some prefer to avoid highlighting the end of the nose to create a slimmer appearance. Highlighters can be cream or powder; Laura Geller Gilded Honey offers a blend of both with a golden tone that is not too icy or silver.
When applying highlighter, ensure it provides a brightening effect and is not darker than your skin tone.
Step 8: Finish with Lipstick and Setting Spray
Various lipstick combinations work well with this look. A popular choice is Charlotte Tilbury Pillowtalk lipstick with MAC Cork lip liner, blended with a lip brush, and a touch of NARS Orgasm lip gloss in the center of the lips.
For lips, a Rum Raisin Lip Pencil diffused with a clear lip gloss can create a wet-lip look without excessive color. To "glam up" the look, add a bolder liner and apply fluttery strip lashes.
Finish the entire look with a hydrating spray. MAC Fix+ is a classic choice that hydrates the skin and removes the matte appearance of powder, giving a dewy finish. Ensure the bottle is held at an appropriate distance to avoid over-spraying.
FULL COVERAGE Makeup Tutorial
The Timeless Appeal of Bronze Makeup
The bronzy makeup look is a universally flattering and enduring trend, perfect for cheering you up and adding a radiant, sun-kissed complexion. It effortlessly transitions from a youthful daytime glow to a seductive evening finish. This versatile look can be easily recreated at home for everyday wear, weddings, or any special occasion, offering a tanned look without sun exposure.
The appeal of a bronzed makeup look, reminiscent of the sun-kissed, just-returned-from-the-beach aesthetic, has remained constant. While styles may evolve slightly, the fundamental tanned bronze look never truly disappears. Icons like J.Lo in the late 1990s and early 2000s epitomized this glow, inspiring makeup trends ever since.