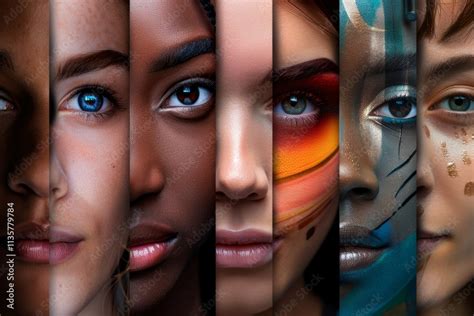
There’s no one way or right way to do makeup; it’s about finding the best way for you to apply makeup, as makeup is deeply personal. While you can easily continue binge-watching YouTube videos and trying your luck with makeup tutorials, the best way to learn how to wear makeup is by investing in your personalized education.
If you want to achieve a polished and confident everyday makeup look, this guide is for you. The truth is, there are so many makeup bloggers and vloggers out there making YouTube videos and makeup tutorials, and it can be hard to know which recommendations to follow and which to ignore. And how about finding a really simple look? Most students come to us after years of trying to DIY their makeup and feeling defeated, while others know right away they need to learn from a credible source.
This guide is not about selling you another Urban Decay palette or hyaluronic acid serum, nor is it about listing the must-have products of the season or sharing a holy grail concealer. There are already enough people doing that. And the last thing you probably need is another beauty product in your kit you don’t know how to use. The advice provided, though generic on a post like this, is applicable to everyone. The ultimate goal is to bring forward your natural beauty and help you elevate your confidence in your makeup skills. Buying the fanciest, most expensive, most professional, or most “buzzed-about” tool will NOT get you better results.
We will walk you through a four-step application routine that you can tweak to suit your skin, preferences, and lifestyle. The goal is not to give you a cookie-cutter tutorial.
Step 1: Skincare is Key
The first step is not even about makeup; it’s about skincare! We all aspire for our skin to have a consistent healthy glow, and the best way to achieve that is through our skincare. Skincare is like brushing your teeth; you do it at least twice a day, morning and evening before bed. You want your skincare routine to do a lot of the heavy lifting in terms of your skin goals.
Do you have dark spots or dark circles? You’ll want to make sure you are addressing them, especially at night. Preparing your skin for makeup may look different depending on the day, how much sleep you had, the weather, and the nature of the day (long day, short day, inside/outside, etc). But you cannot skip this step-you cannot apply makeup to naked skin.
Face primers have become hugely popular in the last few decades and can be a great way to help extend the life of your makeup or achieve a certain look. This doesn’t mean you can’t have skin imperfections; we all have imperfections in our skin that we notice but nobody else does. But, taking care of your skin daily is so important.
If you don’t have a skincare routine yet, it’s recommended to find a guide that shares tips about buying the right skincare products for your skin type and so much more. Also, don’t forget to eat healthy food and drink lots of water.

Choosing the Right Skincare Products
Once again, because of the content that overflows the internet, it’s easy to fall into the false belief that you need to use tons of makeup to achieve a flawless makeup application. More clients and students want foundation that gives us a natural-looking coverage or a minimal makeup look. Liquid foundations come in a wide variety of formulations for all different skin types, that’s why it’s a good idea to really invest in Step 1.
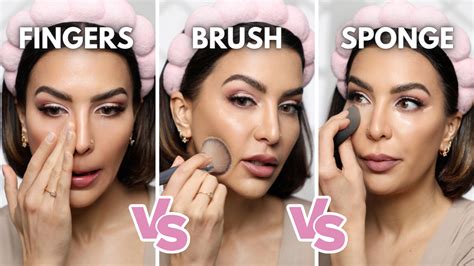
When building foundation coverage, applying with a buffing brush can be effective. When in a hurry, using fingers to apply and blend foundation is a quicker option. For more time or particularly oily days, a paddle-shaped foundation brush can be used. Some foundations are self-setting; always read the foundation bottle or packaging. If it is a self-setting foundation and you are 100% sure you are using the right formula for your skin type, trust that it is.
Expert Tip: Apply primer ahead of time for long-lasting concealer. Choose a face primer based on your skin's needs: hydrating primers with squalane, matte primers with kaolin clay for oil control, luminous primers with hyaluronic acid and collagen for a glow, acne primers with salicylic acid, or primers with Vitamin C for brighter, even skin tone.
Expert Tip: If you're trying to pare down your makeup routine, you can skip concealer. Apply a light amount of concealer using either a concealer brush or your finger by dabbing it under your eyes and gently blending it in.
Step 2: Base and Coverage
When you want to build your foundation, applying with a buffing brush can be effective. When you’re in a hurry, using your fingers to apply and blend your foundation is a quicker option. For more time or if you’re feeling particularly oily that day, a paddle-shaped foundation brush can be used. Some foundations are self-setting; always read the foundation bottle or packaging. If it is a self-setting foundation and you are 100% sure you are using the right formula for your skin type, trust that it is.
These are all tips and tricks that work for some individuals and may or may not work for you. YouTubers and online makeup artists can get away with heavier makeup (and applying liberal amounts of concealer to their faces) because they are on air and are being filmed in studio lighting. Concealer can be used without foundation only when you want to cover up small blemishes or dark spots. It's always recommended to set concealer with a setting powder and an appropriately sized setting brush.
Foundation and Concealer Tips:
- Choose a foundation that works with your skin type and matches your coloring. Tinted moisturizer or BB cream can also be used.
- If your skin is on the oily side, consider a compact or powder foundation.
- Test foundation in-store to ensure it matches your face by dabbing a little on your jawbone.
- Apply foundation evenly over your face using a foundation brush, pad, or your finger. Avoid putting extra layers of foundation over blemishes.
- For blemishes or dark circles, apply a full-coverage concealer. The Laura Mercier Serum Concealer is lightweight and creamy, and stays put all day. It also brightens, hydrates, and smoothes fine lines.
- Do not use your fingers to blend in concealer.
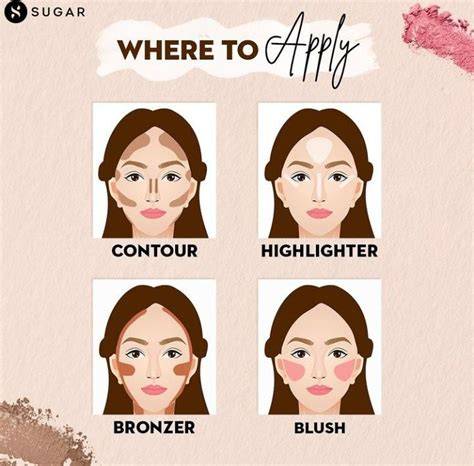
Adding Warmth and Dimension
After concealing any blemishes and evening out your skin tone, adding a bit of warmth and dimension with bronzer is a great step. A little goes a long way! Using a fluffy brush or sculpting brush, lightly dust bronzer along your cheekbones, temples, and jawline to achieve a sun-kissed look. This blends beautifully, avoiding harsh lines.
To highlight the glow, add blush. A go-to option is a cream blush that has a creamy texture and doesn't look cakey. Swirl it on the apples of your cheeks for a natural flush and use a blending brush to blend it in with your skin.
Expert Trick: Apply highlighter right above your cheekbones right after you put on foundation. Choose a pink-toned blush that brings out the best in your facial coloring. Swirl a blush brush in the container, smile, and apply it to the apples of your cheeks in a circular motion.
Generally speaking, in your youth, you’ll begin your blush application on the upper outer corner of the apples of your cheeks. Your highlighter will begin at the high points of your cheeks. Your bronzer, generally a darker shade or two than your skin tone, goes where the sun kisses you. While it’s hard to explain in words and even in a makeup tutorial, this is because we all have different face shapes!
Step 3: Eyes and Brows
The third step in your makeup application is the eyes and brows. When you start thinking like a pro, eye makeup isn’t as complicated as you think. Aside from one-off special occasions, most days a simple eye makeup application is suitable for day-to-day. Shop from your own collection and curate a custom palette. Sometimes the basics (brown, black, cream) are plenty!
There are oodles of tutorials and articles written on how to determine your eye shape. For a more elevated day-to-day look, use one, maybe two eyeshadows max. Practicing eyeshadow looks on paper before practicing on yourself can be helpful.
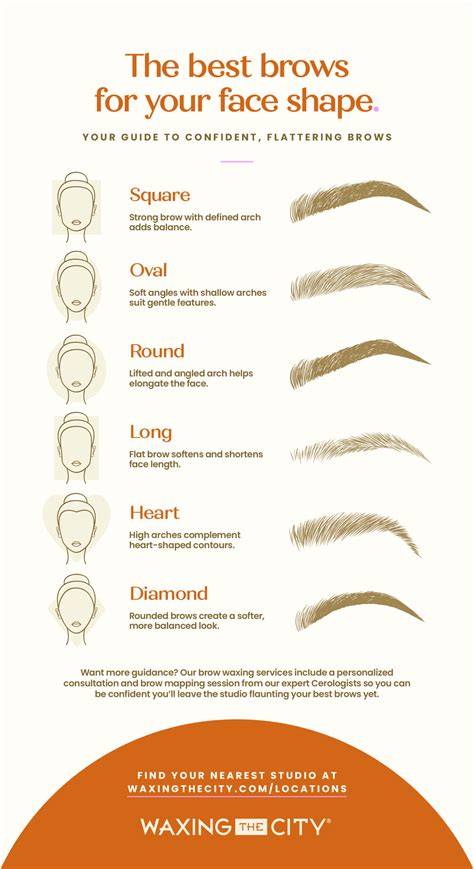
Brows:
- If there’s a lot of contrast between your brows and your skin tone, you might not need much.
- A wand brow gel offers the quickest bang for your buck.
- Potted eyebrow gels are also great if you have more time and want more definition.
- Invest in a good eyebrow brush and spoolie. Remember: less is always more! Don’t overdo it. Taming and lightly filling out brows can make them look amazing.
- A tinted brow gel can provide a full, defined, and clean look.
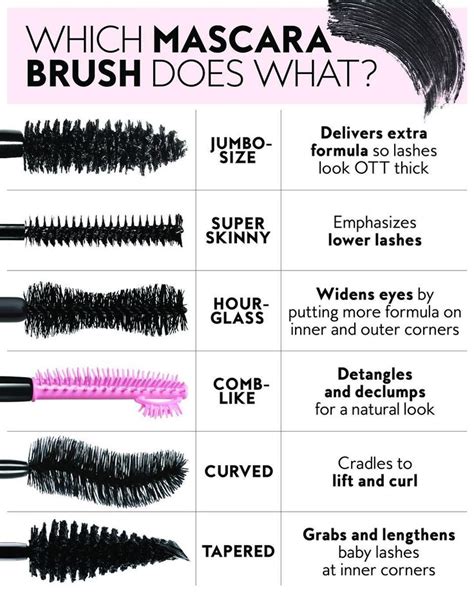
Mascara and Eyeliner for Definition
The most important product in many kits is mascara, as it’s often the most high-impact. The magic is inside the mascara wand; different wands create different effects. Generally speaking, the thicker the wand, the more volume, and the more tapered the wand, the more detail-oriented.
Curling your lashes before mascara is one of the quickest and easiest eye-lifting techniques for most people. Don’t forget to apply mascara to your lower lashes. Our lower lash lines are often neglected because we don’t want to draw attention to our under-eye area, especially as we age. But balance and symmetry in our eye makeup is important.
For most makeup beginners, it’s recommended to skip eyeliner until you are really confident with your mascara application. If you cannot wear mascara, alternative options should be explored.
Expert Tip: Choose a charcoal, navy, or brown eyeliner for daytime wear, saving black eyeliner for nighttime. Apply it just above your eyelashes, ensuring it goes on smooth and straight. Both pencil and liquid liners are great for daytime use.
Apply one coat of mascara on both your upper and lower lashes. Insert the brush at the base of your lashes and sweep outward. After finishing one eye, dip the brush in the bottle again before applying mascara to the other eye. Wiggle the wand back and forth to deposit mascara around each lash, then wiggle it just on the outer corners of your eyes for a slight cat-eye look. Wiggling the mascara at the base of your lashes can make them appear thicker and help define your eye shape when you don’t have time for eyeliner.
Step 4: Lips and Finishing Touches
Lip makeup can be intimidating for many. There are so many different lip colors and product types (lip balm, gloss, liquid lipstick) to choose from, making it hard to know which will work for you. It’s important to know how to shop for your specific shade.
While you don’t have to wear a bold lip to have a put-together makeup look, it’s not advisable to leave them completely naked. You need to know where you want to go in order to get there. Before you can apply makeup confidently, you need to determine if you want a more natural or a more glamorous look. Keep in mind that a natural makeup application is going to require the same skills as a glamorous makeup look; it’s just going to be different colors and formulations for the most part.
Lip Care and Color:
- It's important not to skip hydration for your lips.
- For days with no Zoom calls, apply a sheer, super moisturizing lip balm. A lip plumper can add volume and definition.
- For a touch of color, perfect for days full of Zoom calls or socializing, a swipe of a nourishing tinted lip balm keeps lips from feeling dry and flaky.
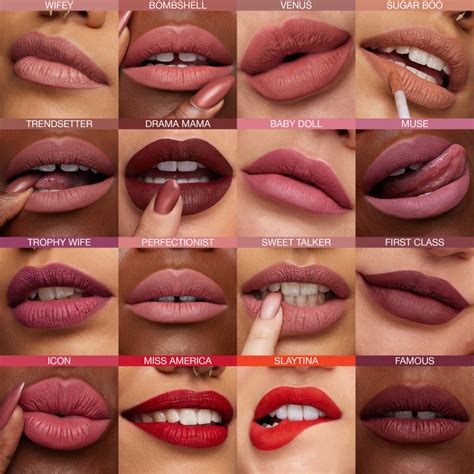
- For a pop of color, a moisturizing lipstick can be used. Prefer subtle colors that enhance natural lip color without looking too bold or overdone.
- Use a pink or neutral-colored lipstick or lip gloss to finish your everyday look. Avoid heavy lipliner and bright, bold colors during the day.
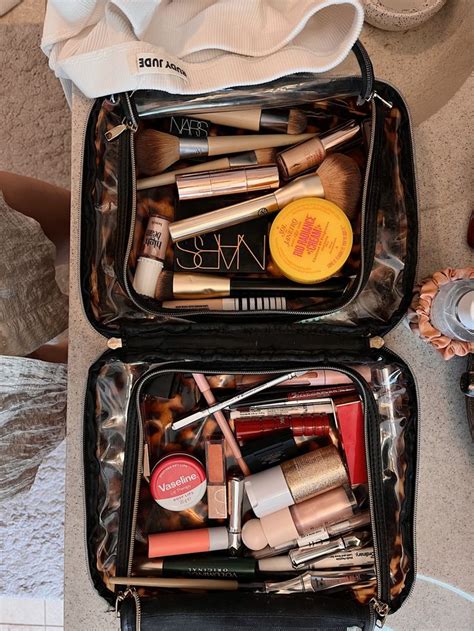
Simplifying Your Makeup Bag and Routine
Rushing out the door, checking your reflection in your phone camera, and realizing your makeup could use a little…something. Who hasn't been there? Purchase a makeup bag so everything is in one spot without distractions. Simplify, simplify, simplify! Just include the products you'll actually use in your makeup bag. With a simple makeup routine, ditch the extra eyeshadows, multiple blush shades, and lipsticks.
Having one warm and one bright blush handy, plus a few lip treatments for different occasions, is often sufficient. Always clean your brushes. A quick-drying brush cleaner is ideal so brushes can be used right away.
Simplifying your makeup routine might seem daunting at first, but it’s all about going back to the basics and figuring out what truly works for you. Begin by taking a good, hard look at your current collection. Lay everything out and assess what products you use daily versus those that only see the light of day on special occasions. Next, focus on multi-purpose products that can save space and time. It’s all about finding the right products for your skin tone and that fit into your quick routine.
Quick Routine (Under 5 Minutes):
- Skincare/Primer (60 seconds): Wash your face and apply a primer suited to your skin type.
- Base (60 seconds): Use a multi-tasking foundation with SPF and skincare benefits, blending with fingers or a brush.
- Cheeks & Eyes (60 seconds): Apply a cream multi-use makeup stick to cheeks, eyelids, and lips for a quick flush of color.
- Mascara (60 seconds): Apply volumizing mascara to upper and lower lashes, focusing on the outer corners for a lifted look.
- Lips (60 seconds): Apply a tinted lip balm for hydration and a touch of color.
Just because you are rushed in the morning doesn’t mean you have to skip your makeup routine. If you only have one minute, toss essential products in a makeup bag and do your makeup on the go.