The lightning bolt makeup look is a bold statement that extends beyond a simple winged eyeliner, often gracing a significant portion of the cheek. To achieve a flawless and long-lasting result, selecting a smudge-free and durable eyeliner is essential. A popular choice, as recommended by makeup artist Elaine, is the IT Cosmetics Superhero No Tug Gel Eyeliner. Elaine praises its creamy texture, which makes it exceptionally easy to work with.

Creating the Base Wing
The process begins with drawing a standard winged eyeliner. Elaine advises starting from the middle of the eyelid and working outwards, gradually thickening the line as you would for a cat eye. For this specific lightning bolt design, it's recommended to make the initial wing on the thicker side and ensure it extends straight out, rather than angling upwards.
Sketching the Lightning Bolt Outline
Next, sketch the outline of the lightning bolt to define its shape. This involves drawing sets of parallel lines that originate from the tip of your initial wing, creating subsequent points for the bolt. Elaine explains that the inner line should extend slightly beyond the outer line. Following this, a second wing is drawn, stemming from these parallel lines. The edge of this secondary wing should be slightly shorter than the first. Finally, a third set of parallel lines is drawn to connect and form a sharp point.
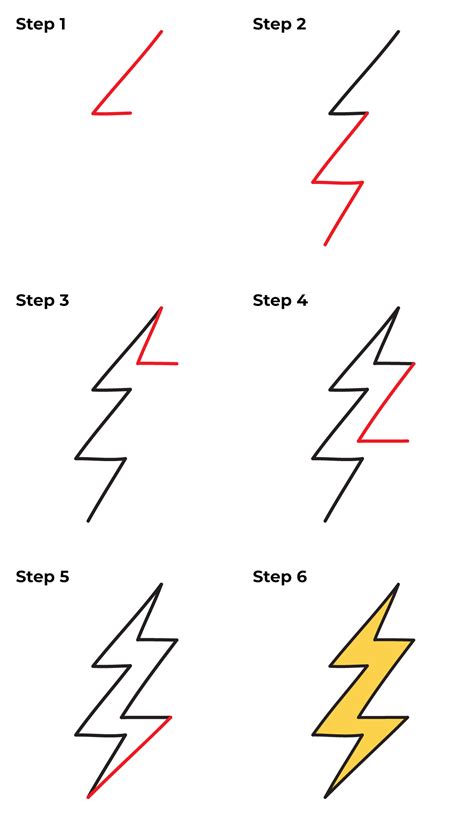
Shading and Refining the Lightning Bolt
Once the outline is sketched, it's time to fill it in. Use your pencil to create small, straight lines from top to bottom within the lightning bolt outline, maintaining consistent pressure. While a creamy pencil is effective for sketching and shading, it might not produce the sharpest points for the lightning bolt. A simple solution is to use an angled brush dipped into the eyeliner to pick up excess product and refine the edges, ensuring crisp and defined points.
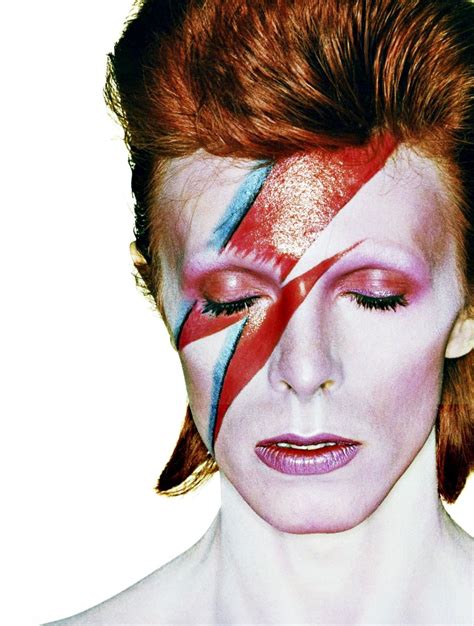
An Alternative Approach: Ziggy Stardust Inspiration
The lightning bolt motif also holds significant cultural relevance, notably as a tribute to the iconic musician David Bowie, and specifically his alter ego, Ziggy Stardust. This makeup tutorial offers a method to transform into this glam rock persona.
Preparing for the Ziggy Stardust Transformation
For those seeking a professional-quality David Bowie look, a detailed transformation can be achieved using specific materials. Before applying makeup, preparing a wig is a crucial step. A wig like the Rocker Mullet Wig can be trimmed to a Bowie-esque style and then enhanced with red hair spray.
Eyebrow and Eyeshadow Application
The next step involves covering the eyebrows, for which maskworld.com Cine-Wax is recommended. Subsequently, various shades of pink eyeshadow are applied to the temples, cheeks, and nose. The eyelids are then treated with a combination of pink and purple eyeshadow.
Creating the Lightning Bolt on the Forehead
For the lightning bolt on the forehead, Scotch tape can be used to ensure straight lines. Apply two strips of tape on either side of the eyebrow as guides. Outline the lightning bolt using red cream makeup and then fill it in, ensuring brush strokes are visible just above the eyebrow.
Adding Color and Detail
Blue shadow is then applied, using a blue eyebrow pencil for this purpose. To complete the look, an ultra-thin black line is drawn between the red and blue areas. Finally, the prepared wig is put on to finalize the Ziggy Stardust transformation.