Spider lashes have emerged as a striking and fashionable trend in the beauty industry. Characterized by their dramatic, separated, and occasionally clumped appearance, spider lashes are often associated with a high-fashion, edgy aesthetic. Whether you aim to achieve this distinctive style for a special occasion or simply wish to make a statement with your daily makeup, mastering the art of spider lashes can significantly elevate your eye makeup game. This guide delves into the essentials of what spider lashes are, why they've become so popular, and how to create them.
What Exactly Are Spider Lashes?
Spider lashes refer to lashes that are intentionally made to appear clumpy, separated, and emphasized to create a bold, dramatic effect. This unique look is achieved by layering mascara or applying eyelash extensions in a specific manner that results in thick, spidery lashes with noticeable gaps between them.
The Rise in Popularity of Spider Lashes
Spider lashes first gained traction in the early 2000s, attributed to their bold, statement-making appeal. They exude a glamorous and sometimes edgy vibe, making them a frequent choice for fashion shows, photoshoots, and red carpet events. Today, many beauty aficionados appreciate the exaggerated look that spider lashes provide, contributing to larger and more intense-looking eyes.
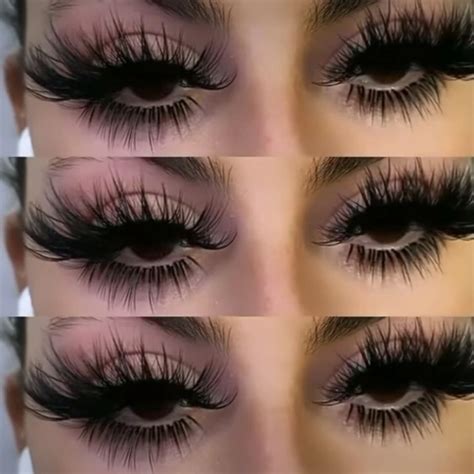
Understanding How Spider Lashes Work
The underlying concept of spider lashes is straightforward yet effective: to separate the lashes while simultaneously making them appear thicker and more defined. This is accomplished through the strategic application of multiple mascara layers or the careful placement of eyelash extensions designed to create an illusion of fullness and separation. The precise positioning of extensions or mascara clumps is crucial for achieving the distinctive spidery effect.
The Role of Eyelash Extensions in Creating Spider Lashes
Eyelash extensions often play a pivotal role in achieving the spider lash look. By utilizing longer extensions on specific lashes and applying them in a slightly uneven pattern, a separated and clumpy appearance is created. Many individuals opt for individual lash extensions or volume lashes to achieve the spider effect, ensuring each lash stands out, thereby enhancing definition and separation.
Eyelash Extensions vs. Mascara for Achieving Spider Lashes
To achieve the perfect spider lashes, two primary methods can be considered: eyelash extensions or high-quality mascara. Both options can help you attain the desired look, but they yield different results.
- Eyelash Extensions: If you seek a long-lasting, dramatic effect, eyelash extensions are likely the superior choice.
- Mascara: For a more temporary, everyday solution, mascara is the go-to option. It is recommended to use mascaras that build volume without excessive clumping, and employ a lash comb to separate the lashes for that perfect spidery effect.
Essential Tools for Spider Lashes
Investing in the right tools can significantly enhance your ability to achieve the spider lash look. A good eyelash curler is vital for lifting and separating your natural lashes, providing a better foundation for mascara or extensions. Furthermore, a lash comb or spoolie is indispensable for combing through your lashes after mascara application to prevent clumps and to accentuate separation.
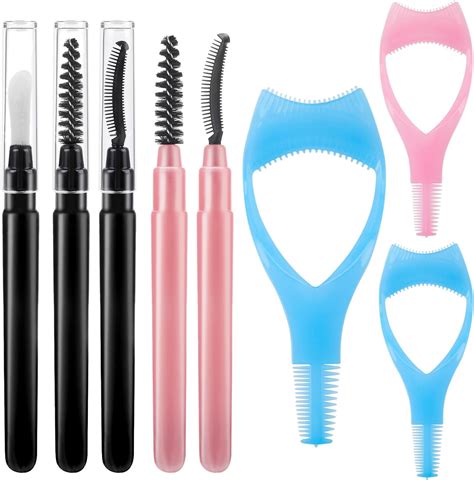
Step-by-Step Guide to Achieving Spider Lashes with Extensions
Creating spider lashes using extensions involves a meticulous process:
Step 1: Gather Your Supplies
- Cluster lashes or individual extensions: Select a length and volume that aligns with your personal style.
- Lash extension glue: A high-quality, long-lasting adhesive is essential.
- Tweezers: For precise application of the lashes.
- Lash sealant: To ensure the lashes remain in place and to extend their lifespan.
- Eyelash curlers (optional): For added curl before applying the extensions.
Step 2: Prepare Your Eyes and Lashes
- Remove any makeup or oils: Use a gentle makeup remover or micellar water to thoroughly clean your eyelids and lashes.
- Curl your natural lashes (optional): If you desire extra curl, use an eyelash curler prior to applying the extensions.
Step 3: Choose Your Lash Style
Opt for a multi-layered, voluminous look. Spider lashes are typically fuller and exhibit a spiky, fanned-out effect. Select lash clusters that are long and wispy to achieve this style.
Step 4: Apply the Lash Glue
Dispense a small amount of glue onto a clean surface, such as the back of your hand or a disposable palette. Dip the base of each lash cluster into the glue, ensuring it is evenly coated. Allow a few seconds for the glue to become tacky.
Step 5: Begin the Application
Start from the outer corner of your eyes and proceed inward. Using tweezers, gently press each cluster of lashes onto your natural lash line, slightly lifting and separating them to create a spider-like, fanned effect. Apply in layers for added volume, overlapping clusters slightly for a fuller, spiky appearance.
Step 6: Let the Lashes Set
Allow the glue to dry completely, which typically takes 2-3 minutes, ensuring the lashes remain securely in place.
Step 7: Seal the Lashes
Once the lashes are dry, apply a lash sealant to lock them in position and ensure durability.
Step 8: Finishing Touches
- Optional: If you desire additional volume or curl, you can use an eyelash curler again to blend the extensions with your natural lashes.
- Touch up with mascara: This step is optional, as many individuals skip it, given the naturally bold nature of the spider lash look.
Applying Eyelash Extensions for Maximum Spidery Effect
When applying eyelash extensions for spider lashes, consider opting for a volume lash style. This technique involves using multiple lash extensions on a single natural lash, which creates thickness and definition. The extensions should be applied unevenly to ensure a gap between each lash, thus producing the iconic spider effect. It is crucial to ensure that your lash technician is experienced in this technique to achieve the best results.
Tips for Applying Mascara for Spider Lashes
Achieving spider lashes with mascara can be somewhat challenging but is entirely feasible. Apply mascara in thin layers, using a zig-zag motion to ensure full coverage of your lashes. After each layer, utilize a lash comb or spoolie to separate the lashes, preventing them from clumping together. This process may require multiple layers to achieve the desired dramatic, spidery look, but patience will yield the results.
Enhancing Lash Growth for Fuller, Spidery Looks
Lash serums are an excellent method for encouraging your natural lashes to grow longer and fuller. If you aim for an even more dramatic spider lash appearance, a lash serum can help increase the length and thickness of your lashes, providing an ideal base for mascara or extensions. Look for serums containing peptides, biotin, or other lash-enhancing ingredients.
Aftercare Tips for Long-Lasting Spider Lashes
Regardless of whether you opt for extensions or mascara, maintaining the look is essential. For extensions, avoid rubbing your eyes and keep your lashes clean to prevent buildup. If you are using mascara, ensure it is gently removed at the end of each day to prevent lash breakage.
Preventing Lash Clumping and Damage
A key factor in maintaining the spider lash look is ensuring your lashes do not become excessively clumpy. Regularly use a clean spoolie to comb through your lashes and ensure that the mascara is evenly distributed.
Common Mistakes to Avoid
Overusing Mascara
While it might be tempting to apply multiple coats of mascara for a dramatic effect, overusing mascara can result in clumpy, heavy lashes. It is important to build up the product gradually and separate your lashes after each layer to avoid this common mistake.
Mistakes During Lash Extension Application
When applying lash extensions for a spider look, be cautious not to use an excessive number of extensions on each lash, as this can lead to unnatural clumping. A trained professional can assist in achieving the optimal balance between volume and separation.
Do Spider Lashes Suit Everyone?
Suitability for Eye Shape and Style
Spider lashes may not be universally flattering. Individuals with smaller eyes might find that the clumpy, separated look can make their eyes appear even smaller. Conversely, those with large, almond-shaped eyes can enhance their eye shape with spider lashes.
When Spider Lashes Might Not Be the Best Choice
If you prefer a more natural or subtle look, spider lashes may not be ideal. They can be overwhelming for some individuals and may not complement every face shape or makeup style.
Alternatives to Spider Lashes
Natural Methods for Fuller, Defined Lashes
If spider lashes are not to your preference, numerous natural methods exist to enhance the appearance of your lashes. Consider using lash serums, eyelash curlers, and lengthening mascaras to achieve a more classic, voluminous look.
Other Lash Styles for Those Who Prefer Not to Wear Spider Lashes
For those who favor a softer lash appearance, styles such as cat-eye lashes or classic voluminous lashes might be more suitable. These styles create a defined and elongated lash line without the clumpy separation characteristic of spider lashes.
Frequently Asked Questions (FAQs)
What are Spider Lashes?
Spider lashes are characterized by a spidery, separated look, typically achieved through lash extensions or a specific mascara technique that creates clumps for a dramatic effect.
Can You Achieve Spider Lashes Without Extensions?
Yes! The spider lash look can be achieved with mascara by carefully building up layers for a clumpy, dramatic effect or by using a lash curler to enhance separation.
How Do I Prevent My Spider Lashes From Looking Too Clumpy?
Focus on using a lightweight mascara and ensure that your lashes are thoroughly separated before applying the next layer. Lash combs or a clean spoolie can be helpful in this regard.
Can I Use Lash Serums to Get Longer, Spidery Lashes?
Lash serums can promote natural lash growth, leading to longer and fuller lashes, which can enhance the spider lash look when combined with mascara or extensions.
How Long Do Spider Lashes Last?
The longevity of spider lashes depends on whether you are using extensions or mascara. Lash extensions can typically last 2-3 weeks, while mascara lasts until it is removed daily.