If you’ve ever spent hours researching Halloween makeup ideas on Instagram, you’ve probably seen your fair share of cool-but-impossible-to-achieve-IRL makeup looks. Skeleton makeup definitely falls into that category. There's a lot of intricacy involved in getting every little detail just right. But thankfully, the makeup gods (read: beauty bloggers) felt for the skill- and time-strapped among us, and half-skull makeup was born. It's got all the spooky marks of classic skeleton makeup for Halloween but still lets you wear a smoky eye.
We called on makeup artist Lijha Stewart (also known as the "Queen of Halloween") to guide us through this step-by-step skeleton makeup tutorial. Here's exactly how to get the look.
Preparation
Level of difficulty:
On a scale of 1 to 5, this is a solid 4. Yes, even though only half your face is actually painted, nailing the shading and symmetry of that portion is pretty hard.
Amount of time required:
Unless you’re an artist, plan to reserve an hour and a half to complete this look.
Supplies you'll need:
- Undereye concealer
- Eyebrow gel
- Black kohl eyeliner
- Shimmery white eye shadow
- Matte brown eye shadow
- Black eye shadow
- False eyelashes
- White face paint
- Translucent finishing powder
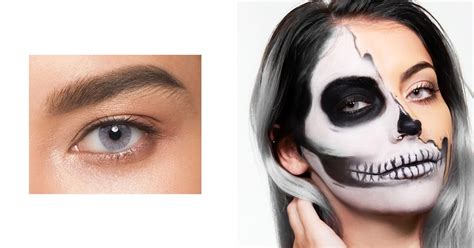
Step 1: Brighten your undereyes
Since the bottom half of your face will be covered in black and white face paints, don’t bother wasting time (or precious product!) prepping that area. You’ll want to focus on making your undereyes as even-toned and bright as possible. We used a full-coverage creamy concealer and set it with translucent finishing powder. Next, you’ll want to intensify your brows with a slightly-darker-than-normal brow gel or pencil. If going bold scares you (or if you think it just looks weird), don’t worry. Once the rest of your face is done, everything will feel balanced.
Product recommendations:
- Make Up For Ever Ultra HD Self-Setting Concealer
- Nars Radiant Creamy Concealer
- Maybelline Master Fix Setting + Perfecting Loose Powder
- Benefit Cosmetics Gimme Brow + Volumizing Eyebrow Gel
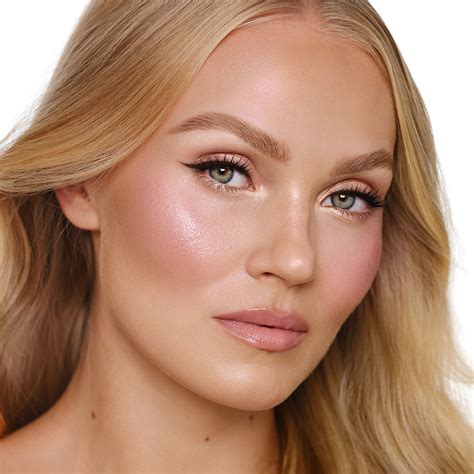
Step 2: Create a smoky eye
While the skeleton mask is the main focal point, nailing the eyes is just as important. An intense smoky eye and major lashes are required to take your death stare to the next level, plus they keep everything balanced. Start with an inky-black eyeliner pencil or liquid liner, and tightline your eyes, tracing the color into the outer V of your eyelid. With a medium shading brush, smudge it out, and do the same on your bottom lash line. For a really intense look, layer on a few more coats, the blacker the better, since this will be acting as your base.
Next, pack a black shadow on top with a dense brush to set your base. With a fluffy brush, apply warm brown eye shadow into the crease as your transition color to add some intensity. Be sure to sweep it under your lower lash line as well. Finish it off with a shimmering white or cream shade in the inner corner as a highlight.
A pair of attention-grabbing lashes finishes the look. This step is completely optional, but if you want to have fun with it, a big, feathery pair will work best. Top them off with mascara, and you’re done. (PS: Here's a tutorial on how to apply false eyelashes if you need it.)
Product recommendations:
- Urban Decay 24/7 Glide-On Eye Pencil
- Stila Stay All Day Liquid Eyeliner
- Fenty Beauty Snap Shadows Mix & Match Eyeshadow Palette
- Lilly Lashes Faux Mink False Lashes in Miami
Step 3: Trace skeleton outline
Now for the fun (yet nerve-racking) part: Outlining the skeleton. “For symmetry purposes, it’s best to work side by side,” says Stewart. “That way everything stays even and you don’t end up with lopsided teeth.” Start by outlining the mask, nose, cheekbones, and teeth with a black kohl pencil, since they're super blendable, it's easy to fix any mess-ups. Then, use a white pencil to fill in the teeth and add highlights. With a skinny eyeliner brush, apply a black waterproof gel liner on top to darken and intensify. Remember to work slowly; don't get stressed out if things aren't perfect. If you need to fix any part of your outline during the process, try using a damp pointed cotton swab to soften or smudge any mistakes.
Product recommendations:
- Make Up For Ever Aqua Resist Color Pencil Eyeliner
- Anastasia Beverly Hills Waterproof Crème Color
Step 4: Fill in with white paint
We know this seems counterintuitive. Wouldn't you want to start with white face paint, then layer the black over it? Nope. Here's why: “When layering black over white, it turns gray,” says Stewart. “And you want the black to be as dark and pigmented as possible.” So, lest you look like a big gray smudge by the end of the night, use a flat, tapered eye shadow brush to fill in the white parts; using gentle outward strokes, starting from the center of your face out toward your hairline. You might need to apply it in a few different layers, so be patient.
Product recommendations:
- Mehron Makeup Clown White Professional Makeup
- Make Up For Ever 226 Medium Eye Shader Brush
Step 5: Shade with black liner
At this point, you might want to go in and touch up any wonky lines or creases that might appear. You’re also going to want to build out and intensify the hollows of your cheekbones and make your skeleton teeth appear more realistic by shading and blending. How to do it: Reapply your black liner where needed, and, with a dense shadow brush, buff out any harsh lines using light, sweeping motions. Take your time-this step is crucial for getting your skeleton just right.
One tip for the teeth: “You can’t really mess this up,” says Stewart. “The more crooked the lines, the better.”
Step 6: Set the look
Make sure all your hard work stays put during whatever trouble you may get up to (imagine this melting off mid-treat? Tragic). Be sure to set your makeup. Set all the black areas with a black eyeshadow, and then use translucent powder on a large, fluffy brush on the white makeup. For an extra layer of security, mist your whole face with a setting spray. After that, you're set for the night.
Alternative Skeleton Makeup Approach
Let's state the obvious: Since it only covers the lower half of your face, this look is pretty much impossible to wear with a mask without smudging. Deciding on a Halloween costume is hard freaking work, because your options are literally endless. With so many alternatives at your disposal, it's easy to push deciding on a Halloween costume off until the last minute. Then, you're left scrambling until you end up just deciding to slip a garbage bag over your head and be trash for Halloween (true story). If this sounds like you, know that I feel you on the most personal, spiritual level I've ever felt anything. Also know that I come bearing this easy skeleton makeup tutorial for Halloween as a solution to our procrastination.
If you’re staring down at a Halloween party invite without any idea what to wear, all you need to do is grab some black clothes and some Halloween makeup inspiration. Between saving you from the headache and expense that costume shopping can be, as well as letting you become one of the most iconic Halloween creatures of all time, it’ll take you less than 30 minutes to complete this skull makeup. Jack Skellington better watch his back.
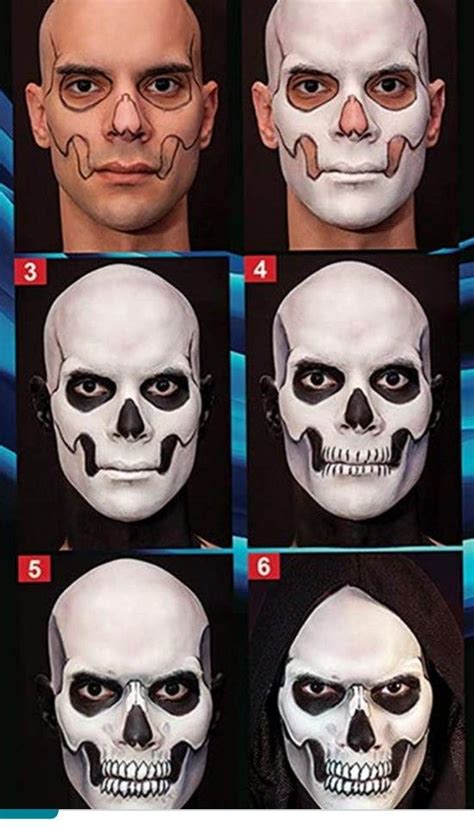
I was lucky enough to sit down with KVD Vegan Beauty Artistry Collective Makeup Artist Steffanie Strazzere, who showed me how to do the easiest skull makeup tutorial I think I've ever come across. Even better, pretty much everything Strazzere used was, at one time, available in one big bundle - the Skeleton Queen Halloween Bundle. Lucky for me, Strazzere put all these products to the test to show me a skeleton makeup look I could do in my sleep if I tried hard enough.
Step 1: Start with a super light foundation all over as a base.
Starting with a clean base, Strazzere applied KVD Vegan Beauty's Lock It Foundation in shade 41 Light ($37, KVD Vegan Beauty) all over my face with a foundation brush. While the shade isn't exactly white, it's light enough to fit the bill for a skeleton costume look without being so stark that you have to layer it a million times to get just the right look. Of course, because this is the brand's cult-favorite Lock It formula designed to last for up to 24 hours without the need for touchups, Strazzere said I didn't need to worry about this look going anywhere for a while - even the products atop the foundation. "Anything that you put on top of [the foundation] is also 24-hour wear, so this is a bulletproof makeup," she says. "You could eat, you could drink, you could cry - you're still gonna be a skeleton at the end of the night." Since Halloween nights can get a bit rowdy, you’ll love knowing that this look won’t budge an inch.
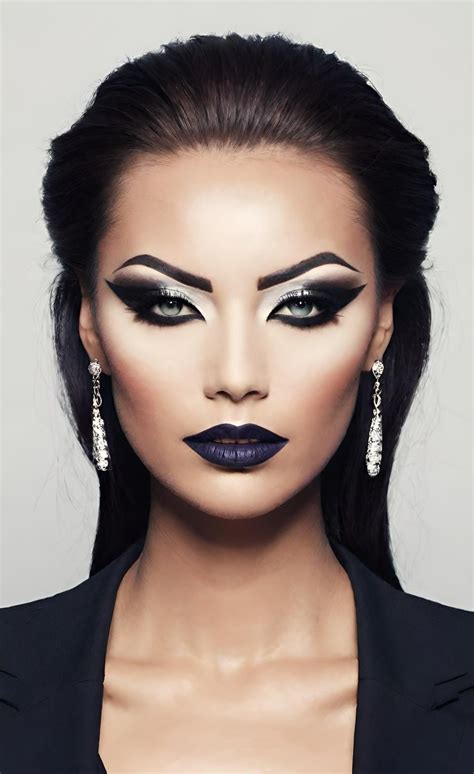
Step 2: Shade the eye, nose, and just under your cheekbones with gray.
The thing about getting a look to go on evenly, look fierce, and stay like that for a while is that you always, always, always need to layer. Therefore, Strazzere started the layering process by reaching for the Shade + Light Crème Contour Palette Refillable Pan in "Grayscale,” which has sadly been discontinued. But, the brand’s Refillable Pan in “Taupe” ($16, KVD Vegan Beauty) will get you the same look. While you might want to hop right in with a black shadow or eyeliner, starting with a gray or cool-toned brown shade allows you to have a guide for where you want the dark black to go while really adding to the hollow, spooky vibe. This way, you won't dive in, realize you've made a mistake, and be stuck with a huge black smudge somewhere.
Obviously, when you think of a skull, the main pieces you have to hit are the hollow parts like the eye sockets, the nose, and just under the cheekbones. Strazzere packed Grayscale in those areas with a fluffy eyeshadow brush, all around where the black shade would eventually be.
Step 3: Layer super pigmented black eyeshadow on top of the gray in your eye area and on your nose.
Here's where you can finally see the look coming together. Strazzere used the black shade "Rubber" from the Fetish eyeshadow palette - but you can use the Super Pomade Vegan Eyeliner, Shadow & Brow Pigment in Black ($21, KVD Vegan Beauty) - and packed in the pigment with an eyeshadow brush over the gray eyeshadow around my eyes and on my nose, layering it until the pigment was opaque enough to give the effect of a hollowed-out area. Due to its strong color, you don’t need much to get the hollowed-out effect.
When it comes to the nose, rather than just drawing a triangle out of eyeshadow, Strazzere got fancy. She extended the two upper sides of the black shade up the sides of my nose, leaving just a small sliver of skin in the middle. This gave the appearance of a real, hollowed nose socket.
🔥He Inherits a Dying Empire, but a System Forces Him to Marry Multiple Wives in 7 Days to Save It!
Step 4: Connect the cheekbone shading to the mouth area and draw lines along your lips in grey to outline teeth.
Next, Strazzere began to construct the mouth area of the skeleton makeup look using gray as a base once again. Using a small eyeshadow brush, she connected the gray area on my cheekbones to a more defined line on each of the outer corners of my mouth. She also drew gray lines up and down atop my lips to create the appearance of teeth on a skeleton.
Step 5: Trace over teeth lines with black eyeliner, smudge black eyeshadow along your inner lips, and refine other details.
Of course, the delight is always in the details. Using KVD Vegan Beauty's Tattoo Liner ($22, KVD Vegan Beauty), Strazzere drew over the gray teeth lines, creating a thinner black line toward the ends of the teeth lines and making it thicker as she moved to the center of my lips. "When you're doing the mouth and the nose, [don't] try to do it in one big swoop. I like to use the Dagger Tattoo liner and almost sketch it out first. Then, once you have the exact placement, go back and do your hard lines. That way, it still looks delicate and you still have thin lines," Strazzere says. "With this guy, because it has that little tapered end, it makes it so easy. So instead of going and trying to do one big line ... if you do all these little tiny ones, it makes it so much easier to go back over." Not needing to do perfect lines may just make this the best makeup tutorial ever.
She then packed black shadow on the inner parts of my lips to make the overall look creepier. It worked. I looked like I was six feet under for years.
Using the black eyeliner once again, Strazzere added some tinier detail lines around the nose socket and near my eyebrows. She also filled in my bottom waterline with black pigment (as if my face wasn't creepy enough at that point). Given how easy it is to poke yourself in the eye, you can also use a softer tip eyeliner like KVD’s Cake Pencil Eyeliner ($20, KVD).
Just like that, the whole look was done in well under 30 minutes, which is shorter than I've spent even brainstorming about what my costume should be.
Finally, she spritzed a bit of the Lock-It Makeup Setting Mist ($29, KVD Vegan Beauty) all over my face, essentially to make sure no part of my new skeleton persona could leave me this day. "It has cucumber extract in it and it hydrates your skin through the makeup, so you'll never look cakey," she says. "It gives your skin the moisture it needs and then helps the foundation to look more like skin."
Step 6: Scare the hell out of everyone.
Naturally, for the rest of the day, I proceeded to walk around my office and scare the living sh*t out of all of my co-workers more easily than ever. Seriously, I just had to take one look at my boss and she fell right out of her seat. The best part, though, was that everyone was supremely impressed with this overall look - and I could tell them that they could do it themselves and they could do it fast.
Since this look is made with non-smudge, long-lasting makeup, you’re going to need to break out some serious makeup removers to get it off at the end of the night. La Roche Posay’s Cleansing Water ($16, Amazon) will de-spookify your face so you don’t have to worry about covering your pillows with black eyeshadow. This super hydrating formula ensures that your skin will feel bright and alive even if it doesn’t look it.
🔥He Inherits a Dying Empire, but a System Forces Him to Marry Multiple Wives in 7 Days to Save It!
All too often, you think a Halloween skeleton makeup tutorial is easy only to find that you don't have the time, the tools, or the patience necessary to recreate all the extravagant skull looks out there, with their super harsh lines, detailed teeth, and intricate cracks. However, a pared-down tutorial like this one from Strazzere proved that you don't need five hours, every special effects makeup product in the world, or even a super duper steady hand to make a stellar look.