Ensuring your clients feel comfortable in your studio and confident in your skills is paramount. Demonstrating that all your tools are clean provides peace of mind. Furthermore, thorough research into products ensures you are equipped with the best, saving you time, money, and ultimately enhancing the quality of your work.
Pre-Treatment Supplies for a Sanitary Workspace
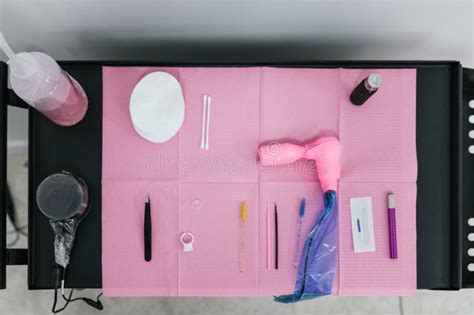
Maintaining a sanitary workstation and ensuring all supplies are clean should be the number one priority for any permanent makeup artist. This section breaks down all the essential items needed, explaining their importance and offering guidance on their selection.
Client Comfort and Ergonomics
Massage Bed/Chair
A comfortable massage bed or reclined chair is essential for clients during the treatment. It should be wide, sturdy, and easy to clean and disinfect.
Stool
As the artist, you need a comfortable stool with wheels for easy maneuverability. A helpful tip is to consider replacing the standard wheels with rollerblade wheels for smoother movement around your workspace.
Workstation Organization and Hygiene
Work Tray
A dedicated work tray is necessary to hold all your treatment items. Opt for a metal tray that is easy to wipe down and disinfect. It's also beneficial if the tray is on wheels.
Tray Liner
A tray liner, often a pedicure bowl liner, covers your work tray. This is the first item placed on the tray to maintain cleanliness.
Dental Bib
A dental bib is placed on top of the tray liner to provide friction, preventing items from shifting on the plastic liner.
Waste Disposal and Sterilization
Red Hazard Bag
This bag should be hung from your tray for the immediate disposal of items that have touched blood but are not sharp. Examples include cotton rounds, wipes used for cleaning brows, and Q-tips that have come into contact with blood.
Sharps Container
Sharps containers are mandatory for all permanent makeup artists to safely dispose of sharp items such as microblading needles, cartridges, and razors. Local regulations dictate the placement and disposal procedures for these containers. It is crucial to check your local regulatory agency for specific requirements.
Disinfectant Wipes
Adherence to your county's health department guidelines is essential. Most jurisdictions require the use of proper disinfectant wipes and/or sprays. Products like Cavicide wipes are highly recommended.
Visibility and Protection
Overhead Light
A good overhead light is crucial for clearly seeing the treatment area. It also plays a vital role in capturing high-quality before and after photos of your clients. Ring lights are a popular and effective choice.
Bed Cover
A bed cover is used to protect the massage bed before the client lies down. It's important to remember that the bed itself still needs to be disinfected after each treatment.
Barrier Film
Barrier film is essential for creating an infection barrier and simplifying the cleaning process. It can be used to cover machines, light knobs, drawers, cabinets, and bottles on your tray.
Personal Protective Equipment
Gloves
Gloves are non-negotiable. Opt for latex-free gloves to prevent allergic reactions. Purchasing gloves from a tattoo distributor may provide thicker options, offering a greater sense of security.
Face Mask
Face masks are worn to cover the mouth and nose, preventing cross-contamination. Disposable paper masks are a practical choice.
Alcohol Pads
Alcohol pads are used to disinfect the treatment area, such as brows or lips, before starting any procedure.
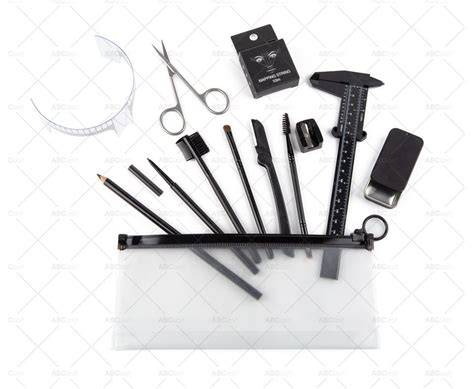
Brow Mapping Tools for Precision
Several important items are necessary for accurate brow mapping in your microblading kit. Many of these can be conveniently found on Amazon.
Measuring and Shaping Instruments
Eyebrow Ruler
There are two main types of eyebrow rulers: reusable plastic rulers, which are easy to move and read, and disposable sticky rulers. While sticky rulers are disposable, they may not adhere well to all skin types and can be challenging to position evenly. A good eyebrow ruler is vital for creating the perfect brow shape.
Eyebrow Caliper Ruler
Microblading calipers are used to measure, locate, and shape symmetrical eyebrows. They feature an exact scale based on aesthetic principles found in nature and the human body. While not universally used, some artists find them beneficial.
Marking and Hair Removal Tools
Sharpie Wax Brow Pencil
This specific wax pencil is highly recommended for mapping eyebrows due to its ability to hold a sharp point and create crisp lines without smearing. Its tip should be sharpened to a flat head screwdriver shape.
Razor Blade
A razor blade is required to sharpen the wax brow pencil, as traditional pencil sharpeners are not suitable. The sharpened tip should resemble a flat head screwdriver.
Mapping String
Pre-inked mapping string is an inexpensive and user-friendly tool for creating symmetrical brow lines.
Tinkle Razor
These razors are excellent for removing stray brow hairs around the mapped outline. They can be offered to the client to take home or disposed of in the sharps container after use. Tweezing is not recommended as it can shock the hair follicle and potentially impede future hair growth.
Detailing and Cleanup Tools
Precision Q-Tips
Precision Q-tips are necessary for cleaning up the outline during the mapping and drawing process. Standard Q-tips are generally too large for this detailed work.
Micellar Water
Micellar water can be used to dampen Q-tips for cleaning the brow area. It can also be used to rehydrate wipes that may have started to dry out during the treatment.
Stencils
While not used by all artists, stencils can be helpful for beginners struggling with brow shape. It is crucial to still map out correct facial proportions before selecting a stencil.
Microblading Tools for the Treatment
This section covers the essential tools required for the actual microblading treatment after the brow shape has been mapped and approved by the client. While some items are available on Amazon, it is crucial to avoid purchasing pigments, microblading blades, and certain numbing agents from this platform.
Color and Application
Pigment
Microblading pigments are specially formulated inks for permanent makeup. When applied with a microblade, they create fine strokes that mimic natural brow hairs. It is vital to use pigments that are rich, stable, and heal true to tone across various skin types and colors. Tina Davies and Permablend are highly regarded pigment lines.
Pigment Rings
These rings are worn on the finger and feature a small cup for pigment. After use, they are disposed of in the red hazard bag.
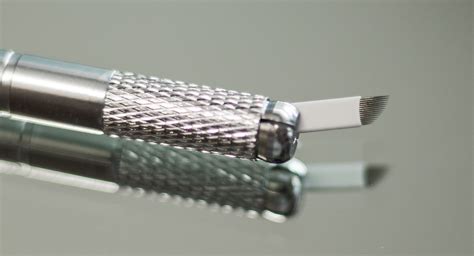
Blades and Handheld Tools
Microblade Needles
Microblading needles can be purchased separately to be inserted into a handheld tool, or as part of an all-in-one disposable microblading pen. Many artists prefer the control offered by inserting blades into a preferred handheld tool. Needles vary in number and angle, with options like slant or U-shaped blades. The diameter of the blade is critical, with a .15mm diameter being the thinnest available, causing less trauma, creating finer strokes, and minimizing discomfort.
Hand Tools (aka Microblading Pen)
When using a handheld tool where the blade is inserted separately, you must either dispose of the entire tool and blade after each client or dispose of the blade and sterilize the hand tool using an autoclave. Due to the inconvenience of autoclaves and the affordability of hand tools, disposing of both the tool and blade after each client is often recommended. All-in-one disposable pens, typically made of plastic, are also available and should be disposed of entirely in the sharps container after each use.
Anesthetics and Application Aids
Topical Numbing Cream
Two anesthetics are typically used. The first is a topical numbing cream, often creamy in consistency. Numbing creams work on the skin's surface and may not penetrate equally for all clients. They should not be left on for longer than 20 minutes, and a 5% lidocaine concentration is recommended. This can also be used for microshading clients.
Second Numbing Agent
A second numbing agent, often gel-like in consistency, is applied to penetrate the skin and enter the bloodstream. These agents should not be left on for more than 10 minutes. Tag 45 is a popular choice. This type of numbing is also suitable for microshading clients and generally leads to greater client comfort.
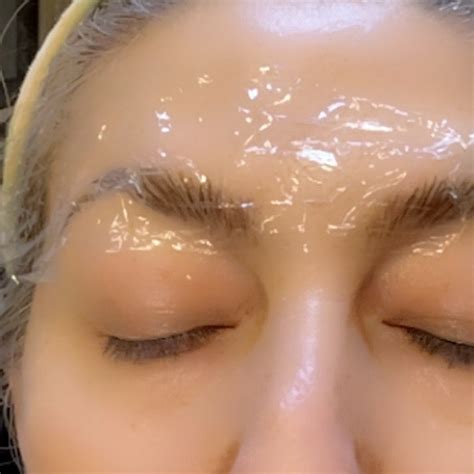
Mini Plastic Wrap
Plastic wrap is used to cover the numbed brows for approximately 20 minutes, helping to activate the numbing agent and keep it in place, even if the client sits up. Compact dispensers make this easy to use.
Ink Cups
Disposable ink cups are useful for holding numbing agents, eliminating the need to keep numbing agent bottles on the tray. After use, they are disposed of in the red biohazard bag.
Cleaning and Finishing Touches
Water Wipes
These wipes, moistened only with water, are excellent for cleaning pigment off the brows during the procedure. They pose no risk of allergic reaction to the client.
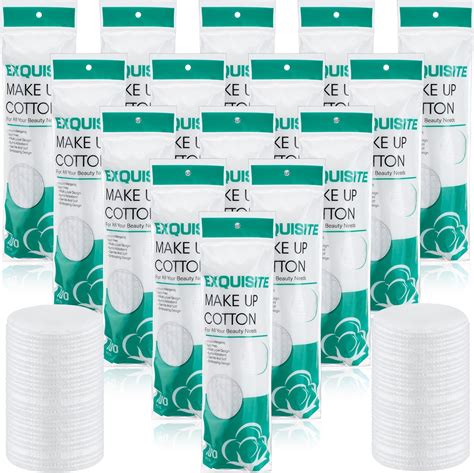
Cotton Rounds
Premium cotton rounds with minimal lint are ideal for dabbing damp skin. As it's easier to work on dry skin, a significant number of these will be used.
Mascara Wands
Mascara wands are useful for combing through brow hairs intermittently during microblading to keep the area clear for stroke placement. They can also be used at the end of the treatment to style the brows.
Supplies for Post-Treatment Aftercare
After completing the microblading treatment, it is essential to provide clients with proper aftercare instructions and necessary items. This typically includes cotton rounds and a healing balm.
Healing and Protection
Healing Balm
A petroleum-free healing balm is recommended. Clients should be instructed to apply it 1-3 times daily, depending on their skin type, and after their touch-up appointment. It is crucial to advise clients against using products containing oils like Vaseline, Aquaphor, A&D, or Neosporin, as these can clog pores, hinder proper healing, and potentially pull ink from the skin.
For cleanup and setup for the next client, refer back to the pre-treatment supplies. Cavicide wipes are essential for disinfection. All items on the tray at the end of the treatment should be disposable. Microblading tools, blades, and razors should go into the sharps container, while other disposables should be bagged and thrown in the trash.
Investing in Yourself as a Microblading Artist
Continuous investment in yourself as a microblading artist is vital. Having the right tools is fundamental. While your initial training may have included a kit, this guide aims to help you identify any missing items. For consistent practice at home, always keep inkless practice skin and a microblading tool with blades readily available to build muscle memory.
Beyond tools, investing in your skills is crucial for a successful microblading business. Consider enrolling in at least one new training course annually. This doesn't necessarily require a significant financial outlay unless you're adding a new service. Continued education can involve learning new stroke patterns, delving deeper into color theory, or exploring online courses focused on specific skills.
Covet Academy offers comprehensive training in Microblading, Microshading, and Tattoo Removal, equipping individuals with the knowledge and support needed to build a successful beauty business. They provide in-person and online courses, as well as continued education for artists seeking to enhance their skills in areas like brow mapping and color theory. Their training includes hands-on experience, printable handbooks, step-by-step guides, and online videos.
Just as musicians invest in quality instruments, microblading artists should prioritize durable and reliable equipment. When selecting tools, consider the following:
- Durability: Will the item last for years?
- Manufacturer: Is the manufacturer a trusted name in the industry, offering support and good customer service?
- Reviews: What do fellow microblading artists recommend?
Key Equipment Considerations:
- High-Quality Microblading Blades: Quality blades are essential for avoiding messy results.
- High-Quality Organic Pigments: These pigments maintain their color over time and do not fade into undesirable hues.
- Comfort During Procedure: Microblading should involve mild discomfort, not significant pain.
- Consistent Practice: Regular practice is crucial, even for experienced artists. Practice skins are available for eyebrows, eyeliner, lips, and areolas.
Blades are indispensable tools for microblading. A universal holder that accommodates various blade types and sizes is also critical for longevity. Pigments are another key component; maintaining a range of skin-tone-appropriate colors ensures you can cater to a diverse clientele and achieve natural results. Pigment mixer machines can aid in efficient and accurate pigment blending. Rulers and calipers allow for precise eyebrow measurement, and marking pencils help outline shapes for client approval. For safety and sanitation, gloves are mandatory. Alcohol-free wipes are recommended for removing makeup and brow pencils without causing skin irritation. Numbing cream is also a necessary supply to enhance client comfort during the procedure.
For those interested in a permanent makeup certification, the Cosmetic Design Academy offers comprehensive microblading classes designed to equip students with the necessary tools and skills to launch their own businesses.
MICROBLADING EYEBROWS STEP BY STEP - Full Process
tags: #equipment #for #microblading