In recent years, brides-to-be have embraced a new wave of wedding trends, with many taking a more hands-on approach to their big day. As a bridal makeup artist, I’ve witnessed countless brides exploring the idea of doing their own makeup, whether it’s to add a personal touch, stay within budget, or simply because they’ve honed their beauty skills during the planning process. This shift is reshaping the way we think about bridal beauty, empowering brides to create looks that feel authentic, confident, and entirely their own.
At the end of the day, with the changes that the onset of Covid-19 has caused, it is completely understandable that brides should opt for this option. So, I came up with an alternative for brides who want to feel special on their wedding day - midway through the pandemic, I began teaching brides how to do their own makeup at home via Zoom lessons. Although it might seem quite daunting to some, all you need is a bit of practice and the right products.
Exclusively for the readers of The Wedding Edition, I’ve created a ‘step-by-step’ guide on how to create a professional wedding makeup look all on your own, based on my Bridal Zoom tutorials. Regardless if there are only 15 close friends and family that can attend your wedding, every bride should feel their very best. Here’s Yasmin Salmon on How to DIY your own bridal makeup.
Yasmin Salmon’s 12 Steps For DIY Bridal Makeup
Step 1 - Skin Care
I believe that skincare is the most important step of any makeup look. I always make sure I’ve cleansed the skin well, so you have a great canvas to start with. This will also ensure the makeup stays on all day. Following a thorough cleansing, I apply moisturizer. I like to use La Roche-Posay Toleriane ultra cream or Bobbi Brown’s Hydrating moisturizer. I find these products the best for plumping and soaking into the skin for a dewy visage. For eye cream, I use the Eborian ginseng eye cream. This will prevent any flakiness or dry skin from developing under the eyes throughout the day.
Step 2 - Primer
For primer on brides, I actually suggest using a combination of the Charlotte Tilbury Wander Glow Primer and Nars’ Radiance Primer. I first apply the Wander Glow Primer all over the face, then the Nars Radiance on the high points of the face: the cheekbones, eyebrow bone (just above the arch of your brows), and nose. The Nars primer also contains SPF, which is always a bonus. I apply all my primers using my hands, and encourage you to do so as well; it ensures a plump, glowy, streak-free look.
Want to know the best primers for all skin types and budgets? Check out TWE’s round-up of The Best Primers For Wedding Makeup.
Step 3 - Foundation
We then move on to foundation. For brides who want a glowing look which mimics the natural appearance of skin, then use the Armani Luminous Silk foundation. It gives a lovely subtle matte finish which looks amazing on camera. If you want more of a full coverage yet still radiant look, use Glow Wish by Huda Beauty. The trick with foundation is to always apply it gradually, starting with a thin layer then building up with a compact foundation brush. Never start with too much product, as that will make you look cakey, and no bride wants that.
Still searching for the perfect foundation for your big day? Here’s our list of The Best Foundations For Brides that has something for every skin type.
Step 4 - Concealer & Eye Primer
For concealer, I always use Nars’ Creamy Radiance. When it comes to application, I always apply it to the inner corner and outer corner of my eye first, then blend into the middle. Using my index finger, I gently pat the product in and upwards towards my hairline. I will then apply the concealer to any other areas of concern: spots, red areas around the nose and mouth. I also apply a small amount of concealer to my eyelids to give me a smooth, even base for eyeshadow.
Step 5 - Contouring
Contouring is a step I do with most of my brides. It’s a great way of defining the face and making you look more chiseled. My go-to contour applicator is the Contour Wand by Charlotte Tilbury. Its liquid formula is very easy to blend and looks super natural when applied the correct way. I always like to apply the product on the back of my hand first so that I can see how much product I need before starting. I then grab a large blending brush and swirl the brush into the product on the back of my hand. Remember, less is more. The first step is applying the contour to the hollows of your cheeks. The way to find the hollows of your cheeks is by sucking in your cheeks and feeling where your cheekbone ends. That’s where you should apply your contour. I will then work the product around the temples and jawline using the same technique.
Step 6 - Setting Powder
One of the most important steps for wedding makeup is ‘setting’ and locking in all that product with a great finishing powder. My personal favourite is the Charlotte Tilbury Airbrush Flawless Finish. I always tell my brides to buy this product for their wedding day. It’s amazing for getting rid of any shine and stops that ‘shiny forehead’ effect you get from the flash in photos. This will be your new bestie on the day! I apply this powder under the eyes and T-Zone.
Step 7 - Eye Shadow
People find applying eyeshadow one of the trickiest parts of a makeup routine, but once you get the hang of it… I think it’s the most fun of the entire process. After I’ve applied the concealer to the eyelids (as I mentioned in step 4), I gradually start warming up the eyes with a bronzer. With a small blending brush, I apply a bronzer to the crease of my eyes in small circular motions, working that product along the crease line. I find this process helpful, especially for beginners, as it works similarly to contouring and makes it easier to see where the shadow should go later on.
My go-to eyeshadow palette for wedding looks is the Tom Ford Eye Colour Quad. I use the ‘Nude Dip’. It’s the perfect combo of nude and warm colours and complements every skin tone.
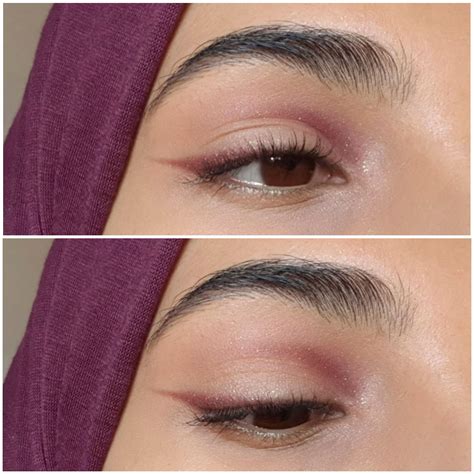
Eyeshadow Step-by-Step Breakdown:
- Start with using the ‘mushroom brown’ shade on the left-hand side in the eye crease. I start by applying this shade directly on top of where we added the bronzer, sweeping it across the entire crease. This will start creating a lovely smoky effect.
- On the outermost corners of the eye, I apply the darkest brown shade from the palette and blend that inward into the crease. I always try and do this process gradually, as if you add too much from the get-go, it’s a lot harder to blend out.
- To brighten the inner corners, I apply the lightest cream shade from the Tom Ford palette using my index finger and pat the colour on.
- Then, using a large eyeshadow blending brush, I sweep across the entire eyelid from the inner corner to the outer corner of my brow to blend all the product out, which gives the eye a lovely lift. It’s all about creating a fox eye.
To bring the bridal eye-look together, I apply a brown pencil liner on the upper lash line. My two favourite pencils are from Sweed Beauty in shade ‘Brown’ or Charlotte Tilbury’s ‘The Classic’ Shimmering Brown.
What I like about using a pencil instead of a liquid liner is that you don’t need to worry about being so precise, as you can smudge the product to the effect you desire. I always apply my brown pencil liner from the outer corner of my lash line to about ¾ of the way inwards. I then go in with a smudger brush and start smoking out the colour into a cat eye, which gives you a lovely elongated eye.
I then finish off the eye look with my all-time favourite mascara from Sweed Beauty. I’m yet to find a mascara to beat it! It makes lashes look so long that most of the time false lashes are not even necessary. Their brush head is truly an innovation. Rather than a conventional round mascara wand, the Sweed Beauty wand resembles that of a comb. This means it coats every lash individually from the root to the tip. Wiggle it up from the root to get the best application of the product on your lashes.
For the perfect thick, fluttering, and flirty lashes, check out TWE’s round-up of The Best Mascaras For Brides.
Step 9 - Blush
Blush is my new bronzer. I can’t get enough of it. Laura Mercier do some great blushes. For paler skin tones, I use the shade ‘Strawberry’, and for darker skin tones, I like to use the shade ‘Sangria’. They’re both such gorgeous colours and stay put throughout the day. When it comes to applying blush, I never want to apply too much product too soon. I will always tap off the excess from my blush brush and gradually apply it from the apples of my cheeks and work my way up towards the hairline. I sometimes also add it to the bridge of the nose for an extra sun-kissed look for my brides.
Step 10 - Bronzer
The next step after blush is bronzer. Again, I turn to Tom Ford Beauty, who do an incredible shade range for bronzers. I regularly use the shade ‘Terra 02’ by Tom Ford on brides. More recently, I’ve been using La Bouche Rouge’s bronzer, which has a lovely matte finish. When it comes to applying bronzer, I always apply it on areas where one would naturally catch the sun: a smattering around the cheeks, on the forehead, and then a little on the chin.
Step 11 - Highlighter
Moving on to highlighter, I like to apply Hourglass’ Highlighter Stick in shade Champagne. I apply this product to the high points of the cheeks, the brow bones, the cupid’s bow, and inner corners of the eye. I like to apply this using my fingers and blending it evenly onto the face.
Step 12 - Lipstick
The last step is the lips. My all-time favourite lipstick and lipliner shade is Pillow Talk by Charlotte Tilbury, which suits almost every complexion and is the perfect colour for nuptials. This is also a must-have product, which I always tell my brides to purchase for their wedding day, so that they can keep topping it up on the big day. Helpful hint? Get your maid of honour to do the duty of holding it for you and remind you to apply it throughout the day.
La Bouche Rouge also have a gorgeous selection of lipstick shades. You can even create your own shade online and in-store. I adore their shade ‘Nude Pink’, which is a lovely subtle pink shade for a wedding. If you’re more of a gloss girl (like me), Iconic London do the most luscious glass-like lip oil. I apply this over the top of my lipstick and liner.
Step 13 - Pop the champagne and celebrate your DIY bridal makeup!
Perfect Wedding Makeup: Step by Step Bridal Tutorial | Charlotte Tilbury
A timeless, elegant bridal look will never go out of style. Every bride-to-be wants to feel beautiful on their big day, and this classic bridal look will achieve that and stay tasteful and classic in pictures for many years to come. Use the Eye Shadow Kit to create your eye look. Run Black/Brown Eye Pencil along your bottom lash line. Tie the look together with a pair of false lashes on your upper lashes. If you'd like a more intense eyeliner look, apply a bit of Black Liquid Eyeliner to the base of your top lashes. Using only the stain portion of Craving Lip Fixation Lip Stain/Gloss, define your Cupid's bow and fill in your lips. Check out these other wedding makeup tutorials.
Makeup | Occasion: Wedding
Wedding Eye Makeup Ideas
Darlings, look and feel like the most beautiful version of yourself with my wonderful wedding eye makeup ideas for brides, bridesmaids, and guests! Unlock the secret to BEAUTIFUL bridal eye makeup with Charlotte’s Bigger, Brighter Eyes eyeshadow palette! From first dates to wedding days, my Exagger-Eyes beauty secrets are destined to create effortless, glowing, flattering eye looks that mesmerize everyone you meet! Pillow Talk looks MAGIC on EVERYONE and works beautifully for a bridesmaid eye makeup look! Use Charlotte’s dreamy Luxury Palette in Pillow Talk to create a soft, romantic nude-pink eyeshadow look with shades of champagne pink, matte dusky rose, soft matte brown, and rose gold sparkle! Shop the Pillow Talk Eye Kit and complete your wedding eye makeup with a soft feline flick eyeliner using Pillow Talk Eyeliner and always remember to add lashings and lashings of Pillow Talk Push Up Lashes!
For a simple, natural-looking, nude-toned wedding eye makeup look, discover Charlotte’s Super Nudes Easy Eye Palette! The Super Nudes Makeup Look is a perfect makeup choice for a wedding guest! The kit includes four icons from The Super Nudes collection including the Super Nudes Easy Eye Palette, Super Nudes Duo Liner, Super Nudes Lipstick, and a Lip Cheat lip liner. First, create a smokey, modern-matte eye look using the smooth, matte shades in the eyeshadow palette, using the liner duo to define and enhance the look of your eyes.
For quick and easy eye makeup MAGIC, discover Eyes to Mesmerize! Glide on the magic of these sparkling cream eyeshadows to create a truly mesmeric Mother of the Bride or Groom eye makeup look! The beautifying, sparkling formula is easy to use and easy to choose, glazing over the eyelid with one swipe to deliver fuss-free shimmer in a range of flattering shades from my signature pink Pillow Talk glow to romantic rose gold and effervescent champagne!
Founder, President, Chairman and Chief Creative Officer of Charlotte Tilbury Beauty
With over 30 years of experience, Charlotte Tilbury MBE is the world's number 1 makeup artist and British beauty entrepreneur.